Pioneer DEH-X3800UI Owner's Manual - Page 6
CD/USB/iPod/AUX - manual
 |
View all Pioneer DEH-X3800UI manuals
Add to My Manuals
Save this manual to your list of manuals |
Page 6 highlights
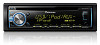
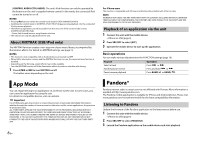
Receiving preset stations 1 Press SRC/OFF to select [RADIO]. 2 Press BAND/ or BAND/ to select the band from [FM1], [FM2], [FM3] or [AM]. 3 Press a number button (1/ to 6/ ). TIP The / buttons can be also used to select a preset station when [SEEK] is set to [PCH] in the FUNCTION settings (page 10). Best stations memory (BSM) The six strongest stations are stored on the number buttons (1/ to 6/ ). 1 After selecting the band, press the M.C. dial to display the main menu. 2 Turn the M.C. dial to select [FUNCTION], then press to confirm. 3 Turn the M.C. dial to select [BSM], then press to confirm. To seek a station manually 1 After selecting the band, press / to select a station. Press and hold / then release to seek an available station. Scanning stops when the unit receives a station. To cancel seek tuning, press / . NOTE [SEEK] needs to be set to [MAN] in the FUNCTION settings (page 10). To store stations manually 1 While receiving the station you want to store, press and hold one of the number buttons (1/ to 6/ ) until it stops flashing. CD/USB/iPod/AUX Playing back Disconnect headphones from the device before connecting it to the unit. 6 En (eject) Disc loading slot USB port M.C. (multi-control) dial SRC (source)/OFF AUX input jack (3.5 mm stereo jack) NOTE The arrangement of the buttons varies depending on the unit. CD 1 Insert a disc into the disc loading slot with the label side up. To eject a disc, stop playback first then press . USB devices (including Android)/iPod 1 Open the USB port cover. 2 Plug in the USB device/iPod using an appropriate cable. NOTE To automatically switch to [USB] source when a USB device/iPod is connected to the unit, set [USB AUTO] to [ON] in the SYSTEM settings (page 11). CAUTION Use an optional Pioneer USB cable (CD-U50E) to connect the USB device as any device connected directly to the unit will protrude out from the unit, which could be dangerous. Before removing the device, stop playback. AOA connections For details on AOA connection, see page 9. MTP connection A device installed with Android OS 4.0 or later can be connected to the unit via MTP, using the cable supplied with the device. However, depending on the connected device and the numbers of the files in the device, audio files/songs may not be able to be played back via MTP. Note that MTP connection is not compatible with WAV file formats, and cannot be used with the MIXTRAX function.
-
 1
1 -
 2
2 -
 3
3 -
 4
4 -
 5
5 -
 6
6 -
 7
7 -
 8
8 -
 9
9 -
 10
10 -
 11
11 -
 12
12 -
13
-
14
-
15
-
16
-
17
-
18
-
19
-
20
-
21
-
22
-
23
-
24
-
25
-
26
-
27
-
28
-
29
-
30
-
31
-
32
-
33
-
34
-
35
-
36
-
37
-
38
-
39
-
40
-
41
-
42
-
43
-
44
-
45
-
46
-
47
-
48
-
49
-
50
-
51
-
52
-
53
-
54
-
55
-
56
-
57
-
58
-
59
-
60
-
61
-
62
-
63
-
64
 |
 |