Pioneer DJM 600 Owner's Manual
Pioneer DJM 600 - DJ Mixer 4 Channel Manual
 |
UPC - 012562506258
View all Pioneer DJM 600 manuals
Add to My Manuals
Save this manual to your list of manuals |
Pioneer DJM 600 manual content summary:
- Pioneer DJM 600 | Owner's Manual - Page 1
DJ MIXER DJM-600 Operating Instructions 1 - Pioneer DJM 600 | Owner's Manual - Page 2
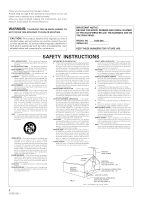
REAR PANEL. MODEL NO. SERIAL NO. DJM-600 KEEP THESE NUMBERS FOR FUTURE USE. SAFETY INSTRUCTIONS READ INSTRUCTIONS - All the safety and operating instructions should be read before the product is operated. RETAIN INSTRUCTIONS - The safety and operating instructions should be retained for future - Pioneer DJM 600 | Owner's Manual - Page 3
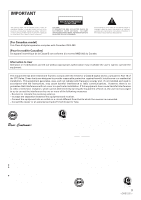
DO NOT REMOVE COVER (OR BACK). NO USERSERVICEABLE PARTS INSIDE. REFER SERVICING TO QUALIFIED SERVICE PERSONNEL. The exclamation point within an listening for a lifetime. We Want You Listening For A Lifetime Used wisely, your new sound equipment will provide a lifetime of fun and enjoyment. Since - Pioneer DJM 600 | Owner's Manual - Page 4
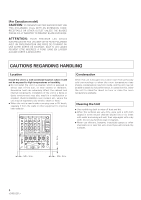
accident. (Avoid installation near cookers etc., where the unit may be exposed to oily smoke, steam or heat.) ÷ When the unit is used inside a carrying case or DJ booth, separate it from the walls or other equipment to improve heat radiation. Condensation When this unit is brought into a warm room - Pioneer DJM 600 | Owner's Manual - Page 5
, Filter, and Flanger Operations 16 Operating Reverb and Pitch Shifter 18 Using an External Effector 19 Using Sampler Recording 20 Using Sampler Playback Functions 21 Using Sampler Edit Function 21 USING THE FADER START FUNCTION 22 Starting with the Channel Fader 23 Starting with the Cross - Pioneer DJM 600 | Owner's Manual - Page 6
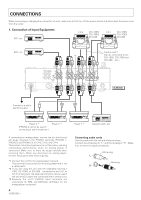
220-230 110-120V -240V VOLTAGE SELECTOR MASTER R OUT2 R 2 COLD 3 HOT L R L R L L 1 GND REC OUT R L R L R LR L SEND (MONO) RETURN (MONO) CH - 4 SUBMIC DJM-600 Connect to a wall's electrical outlet Player 3 *3 (PHONO 3 cannot be used if connecting a sub-microphone.) Player 2 *3 If - Pioneer DJM 600 | Owner's Manual - Page 7
the diagram below. *4 *6 *5 COLD (-) 23 1 HOT (+) GND DJM-600 Power amplifier (Supports XLR input) Cassette deck, etc. External effector *4 MASTER LEVEL ATT. (Master output-level attenuator knob) This knob is used to decrease the output level to protect connected amplifiers and speakers - Pioneer DJM 600 | Owner's Manual - Page 8
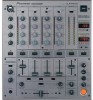
PART NAMES AND FUNCTIONS Control Panel 1 2 3 6 8 MIC CH-1 CD1/LINE LINE PROFESSIONAL CH-2 CH-3 CD2/LINE PHONO 1 LINE PHONO 2 DJ MIXER DJM-600 CH-4 MASTER LINE SUB MIC /PHONO 3 MONO STEREO POWER MIC LEVEL - ∞ 0dB HI -12dB +12dB MID EQ -12dB +12dB LOW -12dB +12dB - Pioneer DJM 600 | Owner's Manual - Page 9
: Select when not using the cross fader. 1 to 4: Select what channels (CH-1 to CH-4) to assign to A and B. Channels not assigned to A or B are output without passing through the cross fader. SAMPLER: Select when using the cross fader to output sound sampled using this unit's effect function, when - Pioneer DJM 600 | Owner's Manual - Page 10
Level Knob Used to adjust the level of the BOOTH MONITOR output terminal on the rear panel. Level is not affected by the master volume (0) and master balance (@). $ BPM Display (see page 14) When AUTO BPM has been selected using the effect/ sampler selector switch (^), displays BPM for the channel - Pioneer DJM 600 | Owner's Manual - Page 11
SEND/ RETURN has been selected. ^ Effect/Sampler Selector Switch Used to select different effects (see page 14). & CH. SELECT (Effect/Sampler Channel Selector Switch) Used to select the source to be effected. * PARAMETER 1, 2 (Effect/Sampler Parameter 1 and 2 Knobs) Used to adjust the values of the - Pioneer DJM 600 | Owner's Manual - Page 12
, simpler mixing of music with different tempos. Use of the TAP switch to input the beat manually makes it possible to set BPM for music for which it is difficult to measure (a capella, improvisation, etc.). Beat Effector (Effects linked to BPM) Links various effects to the BPM calculated with the - Pioneer DJM 600 | Owner's Manual - Page 13
sound produces voice changer effects. Mixing with original sound produces a choral effect. 9. SEND/RETURN (External effect input/output) Makes diverse effects possible through connection to available effectors, samplers, etc. USING THE EFFECT/SAMPLER FUNCTIONS 10. SAMPLER REC Recognizes music BPM - Pioneer DJM 600 | Owner's Manual - Page 14
of music for auto BPM counter selector CH-1 and effect/sampler channel selector switch 2 (CH-2). Auto BPM counter selector MIC CH-1 CD1/LINE LINE PROFESSIONAL CH-2 CH-3 CD2/LINE PHONO 1 LINE PHONO 2 DJ MIXER DJM-600 CH-4 MASTER LINE SUB MIC /PHONO 3 MONO STEREO POWER MIC LEVEL - Pioneer DJM 600 | Owner's Manual - Page 15
effect or sampler operations, the BPM display's counter will blink. In such a case, change the effect/ sampler selector switch to AUTO BPM and use the tap switch for manual off. ÷ If the effect/sampler parameter 1 knob (TIME) is pressed, the counter on the effect parameter/BPM display will display - Pioneer DJM 600 | Owner's Manual - Page 16
and panned sound levels) Resonance (Filter resonance sound level) Feedback (Flanger feedback sound level) Example: Applying the delay effect to music on CH-2. MIC CH-1 CD1/LINE LINE PROFESSIONAL CH-2 CH-3 CD2/LINE PHONO 1 LINE PHONO 2 DJ MIXER DJM-600 CH-4 MASTER LINE SUB MIC /PHONO - Pioneer DJM 600 | Owner's Manual - Page 17
if BPM cannot be measured for more than 2 seconds. In this case, use manual mode to make settings (see page 15). 3 Set the parameter value. When headphone cue's EFFECTS/SAMPLER is pressed, effect sound can be confirmed via headphone output. Setting the Delay Time ÷ Setting the delay time to match - Pioneer DJM 600 | Owner's Manual - Page 18
and reverb sound levels) Effect mix ratio (Balance between original and pitch-shifted sound levels) Example: Display when music on CH-3 has been pitch-shifted 90%. MIC CH-1 CD1/LINE LINE PROFESSIONAL CH-2 CH-3 CD2/LINE PHONO 1 LINE PHONO 2 DJ MIXER DJM-600 CH-4 MASTER LINE SUB MIC - Pioneer DJM 600 | Owner's Manual - Page 19
reverberation of the prior channel's effects will be output. ÷ Only operate the effect/sampler selector switch when effects are off (when the effect/sampler ON/OFF switch is lit orange). Operating it with effects on could generate noise. USING THE EFFECT/SAMPLER FUNCTIONS BPM display 1234 AUTO - Pioneer DJM 600 | Owner's Manual - Page 20
PHONO 2 DJ MIXER DJM-600 CH-4 MASTER LINE SUB MIC case, use manual mode to make settings (see page 15). 3 Set the recording time. ÷ Press the effect beat selector switch and "8" will light on the beat display. * To set the recording time more precisely, use the effect/sampler parameter 1 knob - Pioneer DJM 600 | Owner's Manual - Page 21
2 seconds. In this case, use manual mode to make settings (see page 15). 3 Set the playback time and playback level. ÷ Press the effect beat selector switch and "8" will light on the beat display. * To set the playback time more precisely, use the effect/ sampler parameter 1 knob (TIME). The time - Pioneer DJM 600 | Owner's Manual - Page 22
CD player can be restored to the cue point when the fader is returned to its original position, sampler-type play is also possible. A CDJ-100S Control cables DJM-600 B CDJ-100S Channel fader volume Cross fader volume Cross Fader Start Play and Back Cue Play When "A" is at the cue point during - Pioneer DJM 600 | Owner's Manual - Page 23
connected to the CD player to be controlled or of the sampler. 2 Using the cross fader ASSIGN A and B switches, select the channel (CH-1 or CH-2) that the CD player is connected to or the sampler. 3 Slide the cross fader volume all the way in direction opposite the source you want to start. In - Pioneer DJM 600 | Owner's Manual - Page 24
back hasn't been connected. ÷ Turn on the fader start switch. ÷ Use the control cable to connect the unit and CD player. Effects don't work. ÷ Effect/sampler selector switch hasn't been set correctly. ÷ Effect/sampler parameter 2 knob was set to the minimum (MIN.). ÷ Correctly select the channel - Pioneer DJM 600 | Owner's Manual - Page 25
(output level/impedance) MASTER OUT1 (RCA 0dBV (1V)/1kΩ MASTER OUT2 (XLR 4dBm (1.23V)/600Ω REC OUT (RCA 10dBV (1V)/1kΩ BOOTH MONITOR 0dBV (1V)/1kΩ SEND 14dBV (1V)/1kΩ PHONES 0dBV (1V)/22Ω Frequency characteristics CD/LINE/PHONO/MIC 20Hz to 20kHz SN ratio CD/LINE 87dB (with effects off - Pioneer DJM 600 | Owner's Manual - Page 26
26 - Pioneer DJM 600 | Owner's Manual - Page 27
27 - Pioneer DJM 600 | Owner's Manual - Page 28
CORPORATION 4-1, Meguro 1-Chome, Meguro-ku, Tokyo 153-8654, Japan PIONEER NEW MEDIA TECHNOLOGIES, INC. Multimedia and Mass Storage Division: 2265 East 220th Street, Long Beach, CA 90810, U.S.A. TEL: 800-444-OPTI (6784) PIONEER ELECTRONICS OF CANADA, INC. Industrial Products Department: 300 Allstate
-
 1
1 -
 2
2 -
 3
3 -
 4
4 -
 5
5 -
 6
6 -
 7
7 -
8
-
9
-
10
-
11
-
12
-
13
-
14
-
15
-
16
-
17
-
18
-
19
-
20
-
21
-
22
-
23
-
24
-
25
-
26
-
27
-
28
 |
 |

Operating Instructions
DJ MIXER
DJM-600