Pioneer DJM 600 Owner's Manual - Page 20
Using Sampler Recording
 |
UPC - 012562506258
View all Pioneer DJM 600 manuals
Add to My Manuals
Save this manual to your list of manuals |
Page 20 highlights
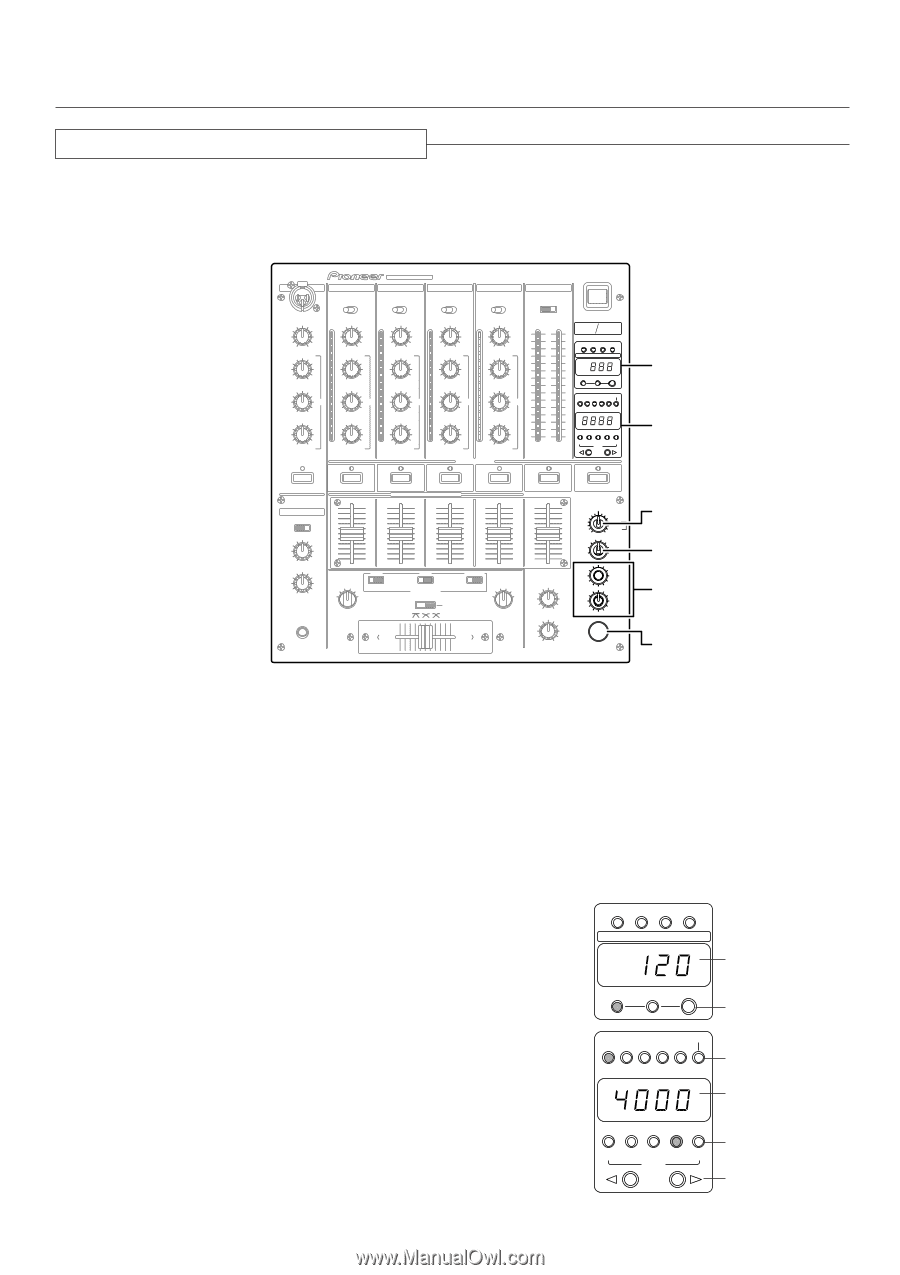
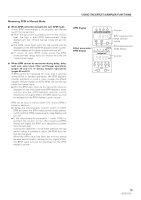
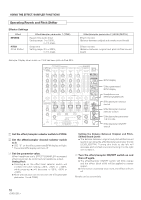
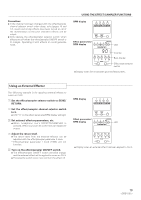
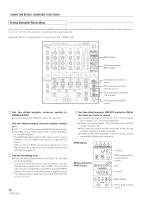
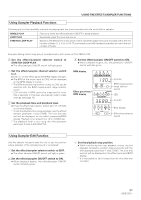
USING THE EFFECT/SAMPLER FUNCTIONS Using Sampler Recording The unit's built-in sampler recognizes the BPM of music to be recorded and automatically records the specified number of beats (1, 2, 4, 8, or 16) only. The maximum recording time is eight seconds. Example: When recording 8 beats of the piece on CH-1 (BPM=120). MIC CH-1 CD1/LINE LINE PROFESSIONAL CH-2 CH-3 CD2/LINE PHONO 1 LINE PHONO 2 DJ MIXER DJM-600 CH-4 MASTER LINE SUB MIC /PHONO 3 MONO STEREO POWER MIC LEVEL - ∞ 0dB HI -12dB +12dB MID EQ -12dB +12dB LOW -12dB +12dB TRIM dB 14 10 7 -∞ +9dB 4 HI 2 1 0 -26dB -1 MID -2 +12dB -3 EQ -5 -7 -26dB +12dB -10 LOW -15 -24 -26dB +12dB TRIM dB 14 10 7 -∞ +9dB 4 HI 2 1 0 -26dB -1 MID -2 +12dB -3 EQ -5 -7 -26dB +12dB -10 LOW -15 -24 -26dB +12dB TRIM dB 14 10 7 -∞ +9dB 4 HI 2 1 0 -26dB -1 MID -2 +12dB -3 EQ -5 -7 -26dB +12dB -10 LOW -15 -24 -26dB +12dB TRIM dB 14 10 7 -∞ +9dB 4 HI 2 1 0 -26dB -1 MID -2 +12dB -3 EQ -5 -7 -26dB +12dB -10 LOW -15 -24 -26dB +12dB HEADPHONES CUE MASTER LEVEL dB 14 10 7 4 2 1 0 -1 -2 -3 -5 -7 -10 -15 -24 L R BEAT BEAT EFFECTS SAMPLER 1234 AUTO BPM COUNTER 70-139 BPM 91-180 BPM BPM MASTER 1 2 3 4 MIC PARAMETER1 % BPM mSec 1/2 3/4 1/1 2/1 4/1 1 2 4 8 16 BEAT TALK OVER CH-1 CH-2 CH-3 AUTO BPM COUNTER SELECTOR CH-4 MASTER EFFECTS/SAMPLER 10 HEADPHONES 9 8 MONO SPLIT STEREO 7 6 5 MIXING 4 3 2 1 0 CUE MASTER LEVEL 10 9 8 7 6 5 4 3 2 1 0 CH-1 - ∞ 0dB 23 OFF ON 1 4 THRU SAMPLER PHONES CROSS FADER ASSIGN A 10 10 10 10 9 9 9 9 8 8 8 8 7 7 7 7 6 6 6 6 5 5 5 5 4 4 4 4 3 3 3 3 2 2 2 2 1 1 1 1 0 0 0 0 CH-2 SAMPLER OFF ON FADER START 1 2 3 OFF ON 2 1 THRU CROSS FADER CURVE 3 4 SAMPLER CROSS FADER ASSIGN B MASTER BALANCE L R BOOTH MONITOR REVERB FRANGER PITCH FILTER SND/RTN TRANS EDIT PAN SINGLE ECHO LOOP DELAY STRETCH AUTO BPM 4 3 REC BEAT SAMPLER MIC CF. A 2 CF. B 1 MASTER CH. SELECT PARAMETER 1 TIME PARAMETER 2 LEVEL/ DEPTH MIN MAX A B - ∞ 0dB ON/OFF TAP BPM display Effect parameter/ BPM display Effect/sampler selector switch Effect/sampler channel selector switch Effect/sampler parameter 1 & 2 knobs Effect/sampler ON/OFF switch 1 Set the effect/sampler selector switch to SAMPLER REC. ÷ The effect/sampler ON/OFF switch will light red. 2 Set the effect/sampler channel selector switch to 1. ÷ LED "1" on the effect parameter/BPM display will light. ÷ The BPM of the music input to CH-1 will be displayed on the BPM display. * The BPM band that matches the music on CH-1 can be selected with the BPM measurement range selector switch. * LED will blink if BPM cannot be measured for more than 2 seconds. In this case, use manual mode to make settings (see page 15). 3 Set the recording time. ÷ Press the effect beat selector switch and "8" will light on the beat display. * To set the recording time more precisely, use the effect/sampler parameter 1 knob (TIME). The time that was set will be displayed on the effect parameter/BPM display. The maximum recording time is eight seconds. * The effect/sampler parameter 2 knob (LEVEL/DEPTH) will not function. 20 4 Set the effect/sampler ON/OFF switch to ON at the time you wish to record. ÷ Automatically begins recording when sound signals from a player, etc., have been detected. ÷ When recording begins, the effect/sampler ON/OFF switch will blink red. ÷ Recording will automatically terminate when the set number of beats has been recorded. ÷ Pressing the effect/sampler ON/OFF switch during recording will terminate recording. BPM display 1234 AUTO BPM COUNTER 70-139 BPM 91-180 BPM BPM Effect parameter/ BPM display MASTER 1 2 3 4 MIC PARAMETER1 mSec 1/2 3/4 1/1 2/1 4/1 1 2 4 8 16 BEAT Counter BPM measurement range selector switch LED Counter Beat display Effect beat selector switch
-
 1
1 -
2
-
3
-
4
-
5
-
6
-
7
-
8
-
9
-
10
-
11
-
12
-
13
-
14
-
 15
15 -
 16
16 -
 17
17 -
 18
18 -
 19
19 -
 20
20 -
 21
21 -
 22
22 -
 23
23 -
 24
24 -
 25
25 -
26
-
27
-
28
 |
 |