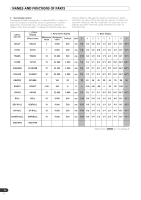
Pioneer DJM-700 Owner's Manual - Page 13
Mixer Operations - rear
 |
UPC - 012562860862
View all Pioneer DJM-700 manuals
Add to My Manuals
Save this manual to your list of manuals |
Page 13 highlights
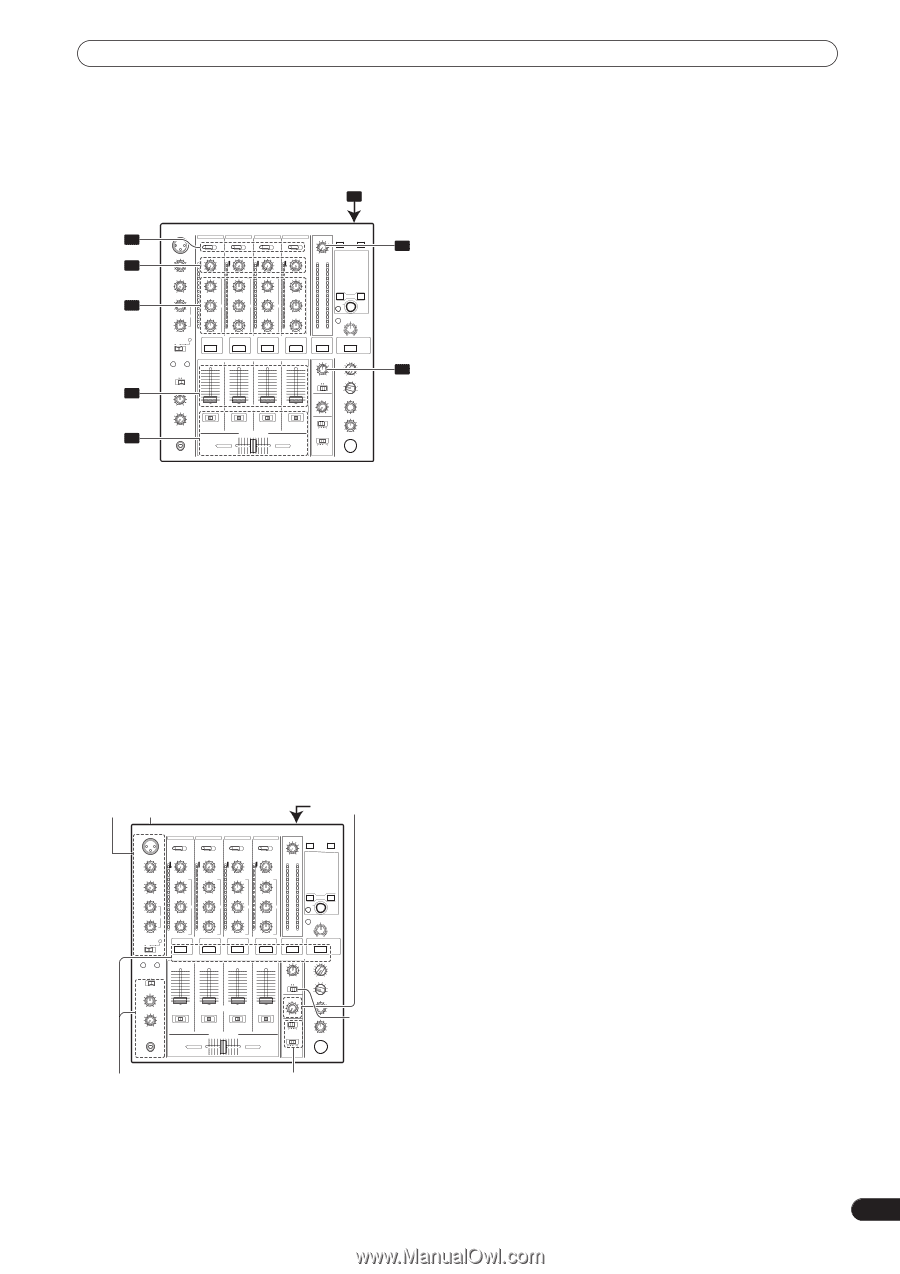
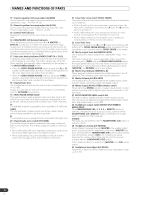
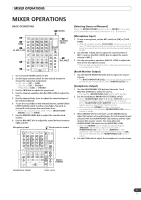
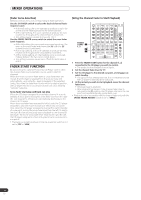
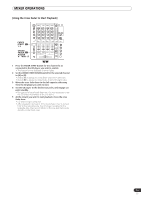
MIXER OPERATIONS MIXER OPERATIONS BASIC OPERATIONS 2 3 TRIM 4 HI, MID, LOW 1 POWER 7 MASTER LEVEL 8 BALANCE 5 6 1 Set rear panel POWER switch to ON. 2 Set the input selector switch for the desired channel to choose the connected component. • CH1: Set to [CD] or [LINE]. CH2: Set to [CD] or [PHONO]. CH3/4: Set to [LINE] or [PHONO]. 3 Use the TRIM dial to adjust the input level. 4 Use the channel equalizer dials (HI, MID, LOW) to adjust the tone. 5 Use the channel fader lever to adjust the sound volume of the selected channel. 6 To use the cross fader on the selected channel, set the CROSS FADER ASSIGN switch to either cross fader channel A or channel B, and operate the cross fader lever. • When not using the cross fader, set the CROSS FADER ASSIGN switch to [THRU]. 7 Use the MASTER LEVEL dial to adjust the overall sound volume. 8 Use the BALANCE dial to adjust the sound balance between right and left. Microphone input Booth monitor output [Selecting Stereo or Monaural] When the MONO/STEREO switch is set to [MONO], the master output becomes a monaural combination of L+R channels. [Microphone Input] 1 To use a microphone, set the MIC switch to [ON] or [TALK OVER]. • When the switch is set to [TALK OVER], any time a sound of over -15 dB is detected by the microphone, the output for all sound sources other than the microphone are attenuated by 20 dB. 2 Use the MIC 1 LEVEL dial to adjust the sound volume of MIC 1, and use the MIC 2 LEVEL dial to adjust the sound volume of MIC 2. 3 Use the microphone equalizer dials (HI, LOW) to adjust the tone of the microphone sound. • The microphone equalizer function operates simultaneously on microphone 1 and 2. [Booth Monitor Output] 1 Use the BOOTH MONITOR LEVEL dial to adjust the sound volume. • The BOOTH MONITOR LEVEL dial can be used to adjust the sound volume independently of the MASTER LEVEL dial. [Headphones Output] 1 Use the HEADPHONES CUE buttons (channels 1 to 4, MASTER, EFFECTS) to select the source. • The selected HEADPHONES CUE button lights brightly. 2 Set the headphones (MONO SPLIT/STEREO) switch. • When HEADPHONES CUE (1, 2, 3, 4 or EFFECTS) button is selected, the selected audio is output to the L channel. When HEADPHONES CUE (MASTER) button is selected, the master audio is output from the R channel. • When set to the [STEREO] position, the sound corresponding to the selected HEADPHONES CUE button is output in stereo. 3 When [MONO SPLIT] is selected, use the MIXING dial to adjust the balance of sound between the left channel (sound selected with the HEADPHONES CUE button), and the right channel (the master sound - but only when the HEADPHONES CUE button for the [MASTER] is ON). • When the MIXING dial is rotated clockwise (toward [MASTER]), the master output (only when the HEADPHONES CUE button for the [MASTER] is ON) increases; when rotated counterclockwise (toward [CUE]), the sound selected with the HEADPHONES CUE button is output. 4 Use the LEVEL dial to adjust the headphones' sound volume. Headphones output MONO/ STEREO Fader curve 13 En
-
 1
1 -
2
-
3
-
4
-
5
-
6
-
7
-
 8
8 -
 9
9 -
 10
10 -
 11
11 -
 12
12 -
 13
13 -
 14
14 -
 15
15 -
 16
16 -
 17
17 -
 18
18 -
19
-
20
-
21
-
22
-
23
-
24
-
25
-
26
-
27
-
28
 |
 |