Pioneer DV-440 Owner's Manual - Page 14
Making, Connections - dvd player manual
 |
View all Pioneer DV-440 manuals
Add to My Manuals
Save this manual to your list of manuals |
Page 14 highlights
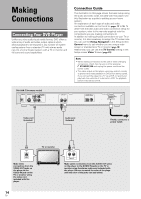
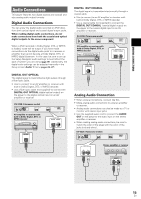
Making Connections Connecting Your DVD Player Unlike any other audiovisual media format, DVD offers a wide array of audio and video output options which allows playback to be enjoyed in any number of system configurations from a standard TV with stereo audio input to a home theater system with a TV or monitor and full surround sound capabilities. Connection Guide The illustration on this page shows the basic setup using the audio and video cords included with this player. Use this illustration as a guide to setting up your home system. An explanation of each type of audio and video connection available can be found on pages 15 to 16. To determine the best audio and video connection setup for your system, refer to the manuals supplied with the components you are making connections to. In addition to making physical connections to your TV or monitor, it is also necessary to assign the TV screen size. You can use the [Setup Navigator] in the Setup screen General menu to set whether you are using a wide screen or standard size TV or monitor (page 18). Additionally, you can use the [TV Screen] setting in the Setup screen Video 1 menu (page 29). Notes • When making connections to this unit or when changing connections, check that the unit is off by pressing STANDBY/ON and unplug the power cord from the power outlet. • The video output on this player uses copy protect circuitry to prevent the video playback on DVDs from being copied. If you connect the player to a TV via a VCR, or record and play back the contents of a disc with a VCR, the playback picture may not be normal. DV-533K (Taiwanese model) CONTROL IN VIDEO OUT S Y COMPONENT VIDEO OUT PB PR AUDIO OUT R L DIGITAL OUT OPTICAL COAXIAL AC IN Video cord (Included) Audio cord (Included) Finally, connect to a power outlet. TV or monitor VIDEO IN Make video connections from the VIDEO OUT jacks on the player to the VIDEO IN jack on the TV or monitor using the video cord included with the player. 14 En R L AUDIO IN Make audio connections from the AUDIO OUT jacks on the player to the AUDIO IN jacks on the TV or monitor using the stereo audio cord included with the player. Be sure to match the color of the plugs with the color of the jacks (red and white).
-
 1
1 -
2
-
3
-
4
-
5
-
6
-
7
-
8
-
 9
9 -
 10
10 -
 11
11 -
 12
12 -
 13
13 -
 14
14 -
 15
15 -
 16
16 -
 17
17 -
 18
18 -
 19
19 -
20
-
21
-
22
-
23
-
24
-
25
-
26
-
27
-
28
-
29
-
30
-
31
-
32
-
33
-
34
-
35
-
36
-
37
-
38
-
39
-
40
-
41
-
42
-
43
-
44
-
45
-
46
-
47
-
48
-
49
-
50
-
51
-
52
-
53
-
54
-
55
-
56
-
57
-
58
-
59
-
60
-
61
-
62
-
63
-
64
 |
 |
