Pioneer PDP-4271HD Owner's Manual - Page 65
Advanced picture adjustments
 |
View all Pioneer PDP-4271HD manuals
Add to My Manuals
Save this manual to your list of manuals |
Page 65 highlights
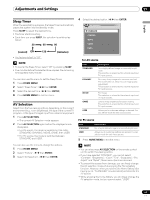
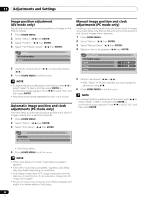
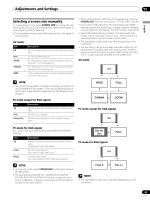
Adjustments and Settings 11 English Advanced picture adjustments The Plasma Display System provides various advanced functions for optimizing the picture quality. For details on these functions, see the tables. Using PureCinema 1 Press HOME MENU. 2 Select "Picture". ( / then ENTER) 3 Select "Pro Adjust". ( / then ENTER) 4 Select "PureCinema". ( / then ENTER) 5 Select the desired parameter. ( / then ENTER) • For the selectable parameters, see the table. PureCinema Automatically detects a film-based source (originally encoded at 24 frames/second), analyzes it, then recreates each still film frame for highdefinition picture quality. Selections Off Deactivates the PureCinema. Standard Produces smooth and vivid moving images (film specific) by automatically detecting recorded image information when displaying DVD or high-definition images (e.g., movies) having 24 frames per second. ADV Produces smooth and quality moving images (as shown on theatre screens) by converting to 72 Hz when displaying DVD images (e.g., movies) having 24 frames per second. NOTE • "Standard" is not selectable when 480p or 720p@60Hz or 1080p@24Hz (HDMI) signals are input. • "ADV" is not selectable when 1080p@24Hz (HDMI) signals are input. Using Color Temp 1 Press HOME MENU. 2 Select "Picture". ( / then ENTER) 3 Select "Pro Adjust". ( / then ENTER) 4 Select "Color Detail". ( / then ENTER) 5 Select "Color Temp". ( / then ENTER) 6 Select the desired parameter. ( / then ENTER) Color Temp Adjusts the color temperature, resulting in a better white balance. Selections High White with bluish tone Mid Natural tone Low White with reddish tone 7 Press HOME MENU to exit the menu. Using CTI 1 Press HOME MENU. 2 Select "Picture". ( / then ENTER) 3 Select "Pro Adjust". ( / then ENTER) 4 Select "Color Detail". ( / then ENTER) 5 Select "CTI". ( / then ENTER) 6 Select the desired parameter. ( / then ENTER) CTI Provides images with clearer color contours. The CTI stands for Color Transient Improvement. Selections Off Deactivates the CTI. On Activates the CTI. 7 Press HOME MENU to exit the menu. Eliminating noise from images 1 Press HOME MENU. 2 Select "Picture". ( / then ENTER) 3 Select "Pro Adjust". ( / then ENTER) 4 Select "NR". ( / then ENTER) 5 Select an item to be adjusted. ( / then ENTER) • You can select "DNR" or "MPEG NR". 6 Select the desired parameter. ( / then ENTER) DNR Eliminates video noise for clean, crisp images. DNR stands for Digital Noise Reduction. Selections Off Deactivates the DNR. High Enhanced DNR Mid Standard DNR Low Moderate DNR MPEG NR Eliminates mosquito noise from video images when a DVD is played, resulting in noise-free images. Selections Off Deactivates the MPEG NR. High Enhanced MPEG NR Mid Standard MPEG NR Low Moderate MPEG NR 7 Press HOME MENU to exit the menu. 65 En
-
 1
1 -
2
-
3
-
4
-
5
-
6
-
7
-
8
-
9
-
10
-
11
-
12
-
13
-
14
-
15
-
16
-
17
-
18
-
19
-
20
-
21
-
22
-
23
-
24
-
25
-
26
-
27
-
28
-
29
-
30
-
31
-
32
-
33
-
34
-
35
-
36
-
37
-
38
-
39
-
40
-
41
-
42
-
43
-
44
-
45
-
46
-
47
-
48
-
49
-
50
-
51
-
52
-
53
-
54
-
55
-
56
-
57
-
58
-
59
-
 60
60 -
 61
61 -
 62
62 -
 63
63 -
 64
64 -
 65
65 -
 66
66 -
 67
67 -
 68
68 -
 69
69 -
 70
70 -
71
-
72
-
73
-
74
-
75
-
76
-
77
-
78
-
79
-
80
-
81
-
82
-
83
-
84
-
85
-
86
-
87
-
88
-
89
-
90
-
91
-
92
-
93
-
94
-
95
-
96
-
97
-
98
-
99
-
100
-
101
-
102
-
103
-
104
-
105
-
106
-
107
-
108
-
109
-
110
-
111
-
112
-
113
-
114
-
115
-
116
-
117
-
118
-
119
-
120
-
121
-
122
-
123
-
124
-
125
-
126
-
127
-
128
-
129
-
130
-
131
-
132
-
133
-
134
-
135
-
136
-
137
-
138
-
139
-
140
-
141
-
142
-
143
-
144
-
145
-
146
-
147
-
148
-
149
-
150
-
151
-
152
-
153
-
154
-
155
-
156
-
157
-
158
-
159
-
160
-
161
-
162
-
163
-
164
-
165
-
166
-
167
-
168
-
169
-
170
-
171
-
172
-
173
-
174
-
175
-
176
-
177
-
178
-
179
-
180
-
181
-
182
-
183
-
184
-
185
-
186
-
187
-
188
-
189
-
190
-
191
-
192
-
193
-
194
-
195
-
196
-
197
-
198
-
199
-
200
-
201
-
202
-
203
-
204
-
205
-
206
-
207
-
208
-
209
-
210
-
211
-
212
-
213
-
214
-
215
-
216
-
217
-
218
-
219
-
220
-
221
-
222
-
223
-
224
-
225
-
226
-
227
-
228
-
229
-
230
-
231
-
232
-
233
-
234
-
235
-
236
-
237
-
238
-
239
-
240
-
241
-
242
-
243
-
244
-
245
-
246
-
247
-
248
-
249
-
250
-
251
-
252
-
253
-
254
-
255
-
256
-
257
-
258
-
259
-
260
-
261
-
262
-
263
-
264
-
265
-
266
-
267
-
268
-
269
-
270
-
271
-
272
-
273
-
274
-
275
-
276
-
277
-
278
-
279
-
280
-
281
-
282
-
283
-
284
-
285
-
286
-
287
-
288
-
289
-
290
-
291
-
292
 |
 |
