Pioneer PDP-433CMX Operating Instructions - Page 9
Before Proceeding - parts
 |
View all Pioneer PDP-433CMX manuals
Add to My Manuals
Save this manual to your list of manuals |
Page 9 highlights
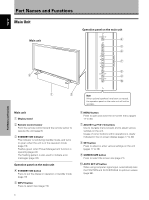
English Before Proceeding How to Use This Manual This manual is set up to follow the course of actions and operations in the order that would seem most logical for someone setting up this unit. Once the unit has been taken out of the box and it has been confirmed that all the parts have been received, it may be beneficial to look over the section "Part Names and Functions" starting on page 6 to become acquainted with the plasma monitor and remote control unit, as their respective buttons and controls will be referred to throughout this manual. The section "Installation and Connections" starting on page 10 covers all the necessary points regarding installation of the plasma display and connections to a wide variety of components. The section "Setting Up the System" starting on page 17 covers the necessary on-screen menu settings to establish correct linkage between the plasma display and connected components. Depending on the connections made, this section may or may not be necessary. The remainder of the sections in this manual is dedicated to the basic operations associated with selecting a source component up to the more complex operations associated with adjusting the plasma display picture to match the requirements of specific components and personal preferences. Screen Displays The example screen displays provided in this manual are those for the PDP-503CMX model. The PDP-433CMX display differs as shown: Example of PDP-503CMX Screen Display: ÷ The PDP-503CMX screen display has a non- displaying border at each side of the display. MAIN MENU PICTURE SCREEN CONT RAST BR I GHT . R. L EVEL G. L E V E L B. L EVEL H. E NHANCE V. ENHANCE :0 :0 : +60 : +60 : +60 :0 :0 SET UP INPUT1 OPTION RE S ET SELECT SET ENTER MENU EXIT Example of PDP-433CMX Screen Display: ÷ The PDP-433CMX screen display fills the display area in both horizontal directions. MAIN MENU PICTURE SCREEN CONT RAST BR I GHT . R. L EV EL G. L E V E L B. L EV EL H. E NHANCE V. E NHANCE :0 :0 : +60 : +60 : +60 :0 :0 SET UP INPUT1 OPTION RE S ET SELECT SET ENTER MENU EXIT Please note that the actual contents displayed are the same for both the PDP-503CMX and PDP-433CMX. Before Proceeding 3 En
-
 1
1 -
2
-
3
-
 4
4 -
 5
5 -
 6
6 -
 7
7 -
 8
8 -
 9
9 -
 10
10 -
 11
11 -
 12
12 -
 13
13 -
 14
14 -
15
-
16
-
17
-
18
-
19
-
20
-
21
-
22
-
23
-
24
-
25
-
26
-
27
-
28
-
29
-
30
-
31
-
32
-
33
-
34
-
35
-
36
-
37
-
38
-
39
-
40
-
41
-
42
-
43
-
44
 |
 |
