Pioneer PDP-6070HD Owner's Manual - Page 22
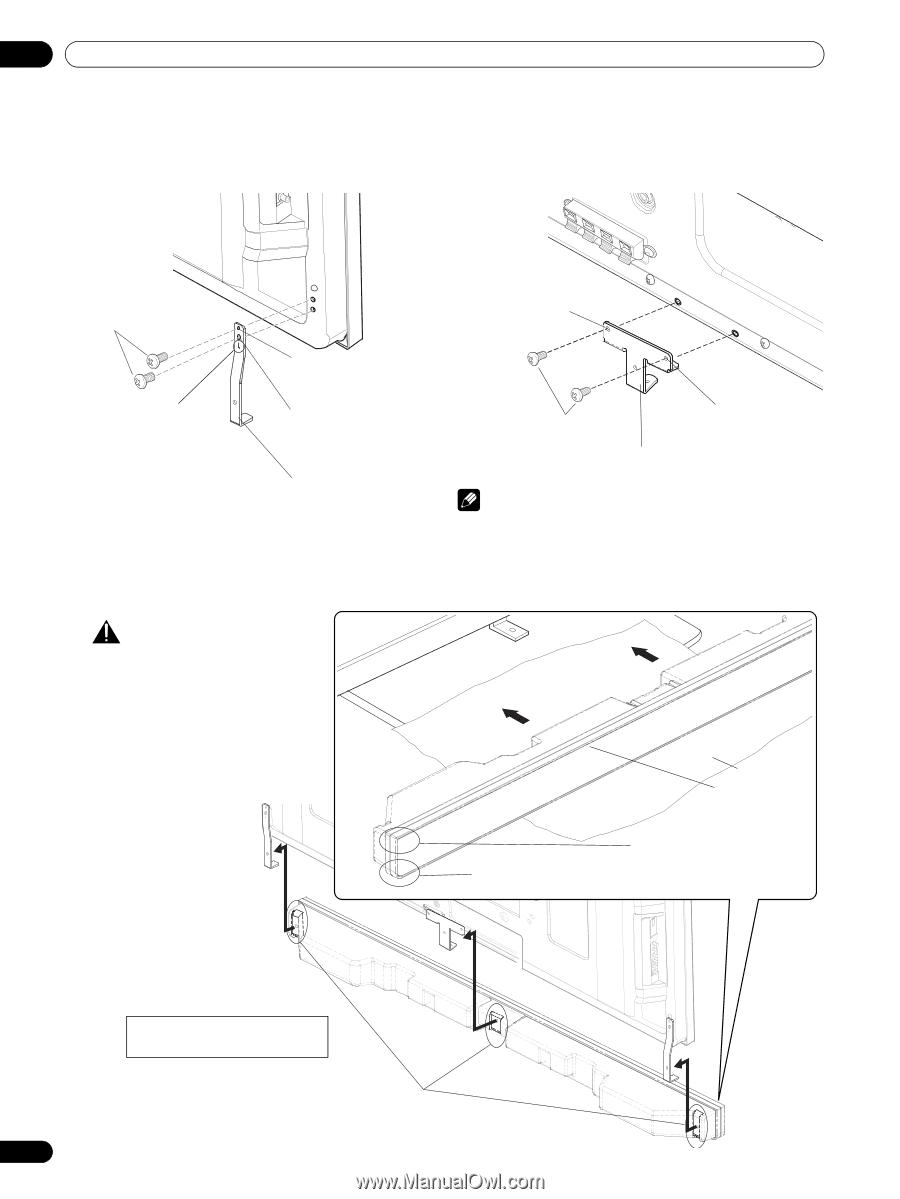
Attach the center fitting to the lower center - rear panel view
 |
View all Pioneer PDP-6070HD manuals
Add to My Manuals
Save this manual to your list of manuals |
Page 22 highlights
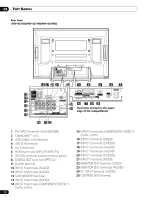
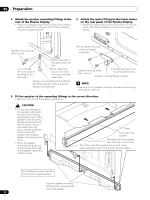
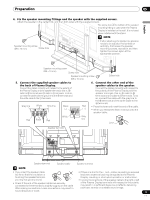
05 Preparation 1. Attach the speaker mounting fittings to the rear of the Plasma Display. • Attach the fittings for right and left sides to the bottom right and left on the rear panel of the Plasma Display using the supplied screws. 2. Attach the center fitting to the lower center on the rear panel of the Plasma Display. • Attach the center fitting to the lower center on the rear panel of the Plasma Display using the two supplied screws. Speaker mounting screw (M5 x 10 mm) ➁ Then, tighten the screw in the oval-shaped screw hole. "L" is inscribed ("R" is inscribed on the fitting for the right side). ➀ Tighten the screw in the upper screw hole first. ➁ Then, tighten the screw in the screw hole right under the upper hole. Speaker mounting fitting for the left side (the fitting method is the same as the fitting for the right side.) Speaker mounting screw (M5 x 10 mm) ➀ Tighten the screw in the round-shaped hole first. Speaker mounting fitting for center NOTE • See page 24 for speaker mounting procedures when using the hung on wall unit. 3. Fit the speaker to the mounting fittings in the correct direction. • Be sure not to mount the speaker upside down. CAUTION • To avoid any damage to the speaker and/or table top stand from striking against each other, fit the speaker to the mounting fittings while confirming their locations. As you may easily strike the stand, use the protective sheet in which the speaker was wrapped between the speaker and stand. • When the speaker mounting fittings do not fit the grooves at the rear of the speaker, adjust the insertion angle. Sheet Front side of the speaker The upper side of the speaker does not have a round corner. The bottom side of the speaker has a round corner when viewed from the front side of the Plasma Display. For illustrative purposes, the table top stand is not presented here. Insert the speaker mounting fittings into the grooves at the rear of the speaker. 22 En
-
 1
1 -
2
-
3
-
4
-
5
-
6
-
7
-
8
-
9
-
10
-
11
-
12
-
13
-
14
-
15
-
16
-
 17
17 -
 18
18 -
 19
19 -
 20
20 -
 21
21 -
 22
22 -
 23
23 -
 24
24 -
 25
25 -
 26
26 -
 27
27 -
28
-
29
-
30
-
31
-
32
-
33
-
34
-
35
-
36
-
37
-
38
-
39
-
40
-
41
-
42
-
43
-
44
-
45
-
46
-
47
-
48
-
49
-
50
-
51
-
52
-
53
-
54
-
55
-
56
-
57
-
58
-
59
-
60
-
61
-
62
-
63
-
64
-
65
-
66
-
67
-
68
-
69
-
70
-
71
-
72
-
73
-
74
-
75
-
76
-
77
-
78
-
79
-
80
-
81
-
82
-
83
-
84
-
85
-
86
-
87
-
88
-
89
-
90
-
91
-
92
-
93
-
94
-
95
-
96
-
97
-
98
-
99
-
100
-
101
-
102
-
103
-
104
-
105
-
106
-
107
-
108
-
109
-
110
-
111
-
112
-
113
-
114
-
115
-
116
-
117
-
118
-
119
-
120
-
121
-
122
-
123
-
124
-
125
-
126
-
127
-
128
-
129
-
130
-
131
-
132
-
133
-
134
-
135
-
136
-
137
-
138
-
139
-
140
-
141
-
142
-
143
-
144
-
145
-
146
-
147
-
148
-
149
-
150
-
151
-
152
-
153
-
154
-
155
-
156
-
157
-
158
-
159
-
160
-
161
-
162
-
163
-
164
-
165
-
166
-
167
-
168
-
169
-
170
-
171
-
172
-
173
-
174
-
175
-
176
-
177
-
178
-
179
-
180
-
181
-
182
-
183
-
184
-
185
-
186
-
187
-
188
-
189
-
190
-
191
-
192
-
193
-
194
-
195
-
196
-
197
-
198
-
199
-
200
-
201
-
202
-
203
-
204
-
205
-
206
-
207
-
208
-
209
-
210
-
211
-
212
-
213
-
214
-
215
-
216
-
217
-
218
-
219
-
220
-
221
-
222
-
223
-
224
-
225
-
226
-
227
-
228
-
229
-
230
-
231
-
232
-
233
-
234
-
235
-
236
-
237
-
238
-
239
-
240
-
241
-
242
-
243
-
244
-
245
-
246
-
247
-
248
-
249
-
250
-
251
-
252
-
253
-
254
-
255
-
256
-
257
-
258
-
259
-
260
-
261
-
262
-
263
-
264
-
265
-
266
-
267
-
268
-
269
-
270
-
271
-
272
-
273
-
274
-
275
-
276
-
277
-
278
-
279
-
280
-
281
-
282
-
283
-
284
-
285
-
286
-
287
-
288
-
289
-
290
-
291
-
292
 |
 |