Pioneer SC-07 Owner's Manual - Page 60
Other connections - free service manual
 |
UPC - 012562891538
View all Pioneer SC-07 manuals
Add to My Manuals
Save this manual to your list of manuals |
Page 60 highlights
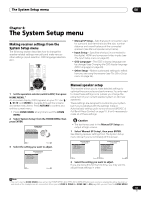
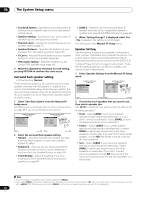
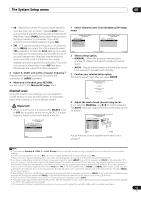
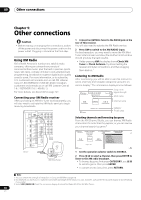
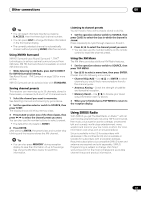
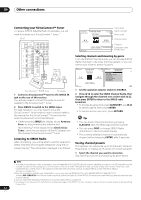
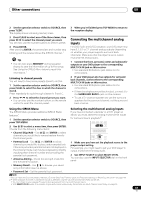
09 Other connections Chapter 9: Other connections Caution • Before making or changing the connections, switch off the power and disconnect the power cord from the power outlet. Plugging in should be the final step. Using XM Radio XM is North America's number one satellite radio company, offering an extraordinary variety of commercial-free music, plus the best in premier sports, news, talk radio, comedy, children's and entertainment programming, broadcast in superior digital audio quality coast to coast. For more information, or to subscribe, U.S. customers visit xmradio.com or call XM Listener Care at 1-800-XMRADIO (1-800-967-2346); Canadian customers visit xmradio.ca or call XM Listener Care at 1-877-GETXMSR (1-877-438-9677). For more details, see About XM on page 127. Connecting your XM Radio receiver After purchasing an XM Mini-Tuner (sold separately), you will also need to activate the XM Radio service to begin receiving broadcasts. LAN(10/100) XM IN HDMI COAXIAL ASSIGNABLE IN 1 (DVD) BD IN IN 2 (CD) IN 3 (DVR2) IN 1 IN 1 (TV/SAT) IN 2 IN (DVR1) 2 IN 3 (VIDEO1) IN 3 IN 4 (CD-R) ASSIGNABLE 1 - 3 ASSIGNABLE OUT 1 (HDMI CTRL) ZONE3/ SOURCE OUT SOURCE OUT OUT 2 OPTICAL DIGITAL 12 V TRIGGER (OUTPUT 12V TOTAL 50mA MAX) SIRIUS IN 1 (DVD) 2 PR IN 1 (VID PB Y PR ZONE 2 OUT R L Z IR Z IN 1 IN 2 OUT IN CONTROL OUT RS-232C PHONO CD IN IN SIGNAL GND L R CAUTION: SPEAKER IMPEDA ATTENTIO ENCEINTE D'IMPE SELECTAB SEE INSTR MANUAL SELECTAB VOIR LE MO D'EMPLOI SC-07 SATELLiTE RADiO SATELLiTE RADiO XM Mini-Tuner 1 Connect an XM Mini-Tuner to the XM IN jack on the rear of this receiver. You will also need to activate the XM Radio service. 2 Press XM to switch to the XM RADIO input. For best reception, you may need to move the XM MiniTuner antenna near a window (the southernmost window should produce the best results). • If after pressing XM the display shows Check XM Tuner or Check Antenna, try disconnecting the receiver and tuner connections, and then plugging them back in.1 Listening to XM Radio After connecting, you will be able to use this receiver to select channels and navigate categories using the onscreen display.2 The information displayed is as follows: Top Menu Preset Class : A Candle In the Wind Elton John The Blend Preset A1 Preset Number 111 Channel Number Song name Signal strength Artist name Channel name Category Category : Hits Category Preset class Selecting channels and browsing by genre From the XM Channel Guide, you can browse XM Radio channels in the order that they appear, or you can narrow your channel search by genre.3 Top Menu Preset Class : A Candle In the Wind Elton John The Blend Preset A1 Preset Number 111 Channel Number Category : Hits Top Menu Channel Guide A/V RECEIVER 0 RADIO ID 1 Preview 2 Highway 1 3 America 4 Hank's Place 5 Fifties (50's) 6 Sixties (60's) 7 Seventies (70's) Category Exit 1 Set the operation selector switch to SOURCE. 2 Press / to select a channel, then press ENTER to listen to the XM radio broadcast. • To browse by genre, first press CATEGORY, use / to select a genre, then press ENTER. • To cancel and exit any time, press RETURN. Note 1 You can check the strength of reception in Using the XM Menu (page 61). 2 It's easiest if you have your TV switched on to take advantage of the OSDs. You can, however, use just the front panel display to do everything if you prefer. 3 Select 000 (RADIO ID) from the on-screen display to check the Radio ID of the XM Mini-Tuner. 60 En
-
 1
1 -
2
-
3
-
4
-
5
-
6
-
7
-
8
-
9
-
10
-
11
-
12
-
13
-
14
-
15
-
16
-
17
-
18
-
19
-
20
-
21
-
22
-
23
-
24
-
25
-
26
-
27
-
28
-
29
-
30
-
31
-
32
-
33
-
34
-
35
-
36
-
37
-
38
-
39
-
40
-
41
-
42
-
43
-
44
-
45
-
46
-
47
-
48
-
49
-
50
-
51
-
52
-
53
-
54
-
 55
55 -
 56
56 -
 57
57 -
 58
58 -
 59
59 -
 60
60 -
 61
61 -
 62
62 -
 63
63 -
 64
64 -
 65
65 -
66
-
67
-
68
-
69
-
70
-
71
-
72
-
73
-
74
-
75
-
76
-
77
-
78
-
79
-
80
-
81
-
82
-
83
-
84
-
85
-
86
-
87
-
88
-
89
-
90
-
91
-
92
-
93
-
94
-
95
-
96
-
97
-
98
-
99
-
100
-
101
-
102
-
103
-
104
-
105
-
106
-
107
-
108
-
109
-
110
-
111
-
112
-
113
-
114
-
115
-
116
-
117
-
118
-
119
-
120
-
121
-
122
-
123
-
124
-
125
-
126
-
127
-
128
-
129
-
130
-
131
-
132
-
133
-
134
-
135
-
136
-
137
-
138
 |
 |
