Pioneer SC-07 Owner's Manual - Page 89
HDMI Control
 |
UPC - 012562891538
View all Pioneer SC-07 manuals
Add to My Manuals
Save this manual to your list of manuals |
Page 89 highlights
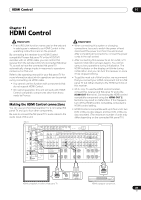
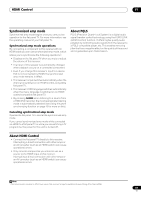
HDMI Control 11 Chapter 11 HDMI Control Important • The KURO LINK function name used on the web and in catalogues is referred to as HDMI Control in the operating instructions and on the product. By connecting this receiver to an HDMI Controlcompatible Pioneer flat panel TV or the HDD/DVD recorder with an HDMI cable, you can control this receiver from the remote control of a connected flat panel TV, as well as have the connected flat panel TV automatically change inputs in response to operations carried out on this unit. Refer to the operating manual for your flat panel TV for more information about which operations can be carried out by connecting via HDMI cable. • You cannot use this function with components that do not support HDMI Control. • We cannot guarantee this unit will work with HDMI Control-compatible components other than those made by Pioneer. Making the HDMI Control connections You can use synchronized operation for a connected flat panel TV and up to four other components. Be sure to connect the flat panel TV's audio cable to the audio input of this unit. Important • When connecting this system or changing connections, be sure to switch the power off and disconnect the power cord from the wall socket. After completing all connections, connect the power cords to the wall socket. • After connecting this receiver to an AC outlet, a 15 second initialization process begins. You cannot carry out any operations during initialization. The HDMI indicator on the display unit blinks during initialization, and you can turn this receiver on once it has stopped blinking. • To get the most out of this function, we recommend that you connect your HDMI component not to a flat panel TV but rather directly to the HDMI terminal on this receiver. • SC-07 only: To use the HDMI control function, connect this receiver and flat panel TV using the HDMI OUT 1 terminal. Connecting the HDMI control compatible component using the HDMI OUT 2 terminal may result in malfunction. If this happens, turn off the HDMI control compatible component's HDMI control setting. • HDMI Control is compatible with up to four units, two DVD or Blu-ray disc players and two DVD or Blu-ray disc recorders. (The maximum number of units may differ depending on the connected flat panel TV.) SC-07 LAN(10/100) XM IN HDMI COAXIAL ASSIGNABLE IN 1 (DVD) BD IN IN 2 (CD) IN 3 (DVR2) IN 1 IN 1 (TV/SAT) IN 2 IN (DVR1) 2 IN 3 (VIDEO1) IN 3 ASSIGNABLE 1 - 3 IN 4 (CD-R) ASSIGNABLE OUT 1 (HDMI CTRL) ZONE3/ SOURCE OUT SOURCE OUT OUT 2 OPTICAL DIGITAL 12 V TRIGGER (OUTPUT 12V TOTAL 50mA MAX) SIRIUS IN IR IN 1 IN 2 OUT IN CONTROL OUT RS-232C 1 IN 1 IN 2 IN 3 (DVD) 2 PR (VIDEO1) PR PB Y (VIDEO2) PB Y PR ZONE 2 OUT R L PB Y MONITOR VIDEO OUT ASSIGNABLE 1 - 3 COMPONENT VIDEO ZONE 2 OUT ANTENNA S-VIDEO FM UNBAL 75 AM LOOP ZONE 3 OUT VIDEO PHONO CD IN IN SIGNAL GND L CD-R/TAPE OUT IN DVD TV/SAT VIDEO1 VIDEO2 DVR1 IN IN IN IN OUT IN DVR2 OUT IN FRONT CENTER SURROUND SURROUND BACK (Single) L PRE OUT R SUBWOOFER MULTI CH IN FRONT CENTER SURROUND SURROUND BACK L R SPEAKERS R SURROUND BACK/ B CAUTION: SPEAKER IMPEDANCE 6Ω - 16Ω . ATTENTION: ENCEINTE D'IMPEDANCE DE 6Ω - 16Ω . L (Single) SELECTABLE SEE INSTRUCTION MANUAL SELECTABLE VOIR LE MODE D'EMPLOI R SURROUND L R SUBWOOFER AR FRONT L CENTER HDMI OUT HDMI IN DIGITAL OUT R AUDIO L AUDIO OUT HDMI-compatible monitor or flat panel TV HDMI-equipped component 89 En
-
 1
1 -
2
-
3
-
4
-
5
-
6
-
7
-
8
-
9
-
10
-
11
-
12
-
13
-
14
-
15
-
16
-
17
-
18
-
19
-
20
-
21
-
22
-
23
-
24
-
25
-
26
-
27
-
28
-
29
-
30
-
31
-
32
-
33
-
34
-
35
-
36
-
37
-
38
-
39
-
40
-
41
-
42
-
43
-
44
-
45
-
46
-
47
-
48
-
49
-
50
-
51
-
52
-
53
-
54
-
55
-
56
-
57
-
58
-
59
-
60
-
61
-
62
-
63
-
64
-
65
-
66
-
67
-
68
-
69
-
70
-
71
-
72
-
73
-
74
-
75
-
76
-
77
-
78
-
79
-
80
-
81
-
82
-
83
-
 84
84 -
 85
85 -
 86
86 -
 87
87 -
 88
88 -
 89
89 -
 90
90 -
 91
91 -
 92
92 -
 93
93 -
 94
94 -
95
-
96
-
97
-
98
-
99
-
100
-
101
-
102
-
103
-
104
-
105
-
106
-
107
-
108
-
109
-
110
-
111
-
112
-
113
-
114
-
115
-
116
-
117
-
118
-
119
-
120
-
121
-
122
-
123
-
124
-
125
-
126
-
127
-
128
-
129
-
130
-
131
-
132
-
133
-
134
-
135
-
136
-
137
-
138
 |
 |
