Pioneer SC-75 Owner's Manual - Page 108
Troubleshooting, Power, No sound
 |
View all Pioneer SC-75 manuals
Add to My Manuals
Save this manual to your list of manuals |
Page 108 highlights
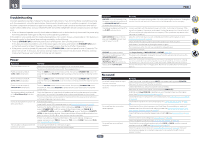
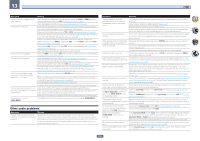
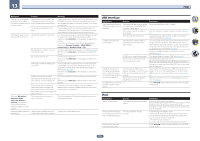
13 FAQ Troubleshooting Incorrect operations are often mistaken for trouble and malfunctions. If you think that there is something wrong with this component, check the points below. Sometimes the trouble may lie in another component. Investigate the other components and electrical appliances being used. If the trouble cannot be rectified even after exercising the checks listed below, ask your nearest Pioneer authorized independent service company to carry out repair work. ! If the unit does not operate normally due to external effects such as static electricity disconnect the power plug from the outlet and insert again to return to normal operating conditions. If the problem is not solved after the troubleshooting below, if the screen freezes unexpectedly or if the buttons on the remote control or front panel stop working completely, do the following: ! Press u STANDBY/ON on the front panel to turn off the power, then turn the power back on. If this does not solve the problem, turn off the power again, then press and hold the u STANDBY/ON button on the front panel for at least 10 seconds. (The power turns on, then turns off after 10 seconds.) ! If the power cannot be turned off, press and hold u STANDBY/ON on the front panel for over 10 seconds. The power will turn off. In this case, the various settings made on the receiver may be cleared. (However, settings made when the power was turned off normally are not cleared.) Power Symptom Remedy The power does not turn on. Make sure that the power cord is plugged in to an active power outlet. Try disconnecting from the power outlet, then plugging back in. Power cannot be turned off. (ZONE 2 ON is displayed.) Press the ZONE 2 button on the remote control, then press u STANDBY/ON to turn the power off. Next, press RECEIVER to set the remote control back to the AV amplifier control mode. Power cannot be turned off. (ZONE 3 ON is displayed.) Press the ZONE 3 button on the remote control, then press u STANDBY/ON to turn the power off. Next, press RECEIVER to set the remote control back to the AV amplifier control mode. Power cannot be turned off. (HDZONE ON is displayed.) Press the HDZONE button on the remote control, then press u STANDBY/ON to turn the power off. Next, press RECEIVER to set the remote control back to the AV amplifier control mode. The receiver suddenly switches off or the iPod iPhone iPad indicator blinks. Check that there are no loose strands of speaker wire touching the rear panel or another set of wires. If so, re-attach the speaker wires, making sure there are no stray strands. The receiver may have a serious problem. Disconnect from the power and call a Pioneer authorized independent service company. During loud playback the power sud- Turn down the volume. denly switches off. Lower the 63 Hz and 125 Hz equalizer levels in the Manual MCACC setup on page 92. Switch on the digital safety feature. While holding down ENTER on the front panel, press u STANDBY/ON to set this receiver to the standby mode. Use TUNE i/j to select D.SAFETY cOFFd, and then use PRESET k/l to select 1 or 2 (select D.SAFETY cOFFd to deactivate this feature). If the power switches off even with 2 switched on, turn down the volume. With 1 or 2 on, some features may be unavailable. If there is very little low frequency information in the source material, change your speaker settings to Front: SMALL / Subwoofer: YES, or Front: LARGE / Subwoofer: PLUS (see Speaker Setting on page 99). The unit does not respond when the Try switching the receiver off, then back on again. buttons are pressed. Try disconnecting the power cord, then connect again. Symptom AMP ERR blinks in the display, then the power automatically switches off. The ADVANCED MCACC blinks and the power does not turn on. Remedy The receiver may have a serious problem. Do not try switching the receiver on. Unplug the receiver from the wall and call a Pioneer authorized independent service company. The receiver suddenly switches off or the FL OFF indicator blinks. There is a problem with the receiver's power unit or fan. Try turning on the power. If the same thing happens, the receiver is damaged. Unplug the receiver from the wall and call a Pioneer authorized independent service company. (Other symptoms may appear when the power is turned on.) AMP OVERHEAT blinks in the display and the FL OFF indicator flash and the power turns off. Allow the unit to cool down in a well-ventilated place before switching back on (see Installing the receiver on page 10). Check whether the cables used to connect the speakers are short-circuited. Wait at least 1 minute, then try turning the power on again. The temperature within the unit has exceeded the allowablevalue. HDZONE cannot be turned on. The receiver suddenly power off or ADVANCED MCACC flashes. Lower the volume level. Set Output Setting at MAIN/HDZONE to HDZONE (page 104). The power unit is damaged. Unplug the receiver from the wall and call a Pioneer authorized independent service company. FAN STOP is displayed, then iPod iPhone iPad indicator blinks. The built-in cooling fan is malfunctioning. Do not try switching the receiver on. Unplug the receiver from the wall and call a Pioneer authorized independent service company. Display blinks 12V TRG ERR. An error has arisen in the 12 V trigger jacks. Reconnect accurately then turn the power back on. No sound Symptom No sound is output when an input function is selected. No sound is output from the front speakers. No sound from the surround or center speakers. No sound from surround back speakers. Remedy Check the volume, mute setting (press MUTE) and speaker setting (press SPEAKERS). Make sure the correct input function is selected. Check that the MCACC setup microphone is disconnected. Make sure the correct input signal is selected (press SIGNAL SEL). Note that when Fixed PCM ON is selected, you won't be able to hear any other signal format (see Setting the Audio options on page 74). Check that the source component is connected properly (see Connecting your equipment on page 19). Check that the speakers are connected properly (see Connecting the speakers on page 23). Check that the Stereo listening mode or the Front Stage Surround Advance mode isn't selected; select one of the surround listening modes (see Enjoying various types of playback using the listening modes on page 59). Check that the surround/center speakers are not set to NO (see Speaker Setting on page 99). Check the channel level settings (see Channel Level on page 99). Check the speaker connections (see Connecting the speakers on page 23). Check that the surround back speakers are set to LARGE or SMALL, and the surround speakers are not set to NO (see Speaker Setting on page 99). Check the speaker connections (see Connecting the speakers on page 23). If only one surround back speaker is connected, make sure it's connected to the left channel speaker terminal. 108
-
 1
1 -
2
-
3
-
4
-
5
-
6
-
7
-
8
-
9
-
10
-
11
-
12
-
13
-
14
-
15
-
16
-
17
-
18
-
19
-
20
-
21
-
22
-
23
-
24
-
25
-
26
-
27
-
28
-
29
-
30
-
31
-
32
-
33
-
34
-
35
-
36
-
37
-
38
-
39
-
40
-
41
-
42
-
43
-
44
-
45
-
46
-
47
-
48
-
49
-
50
-
51
-
52
-
53
-
54
-
55
-
56
-
57
-
58
-
59
-
60
-
61
-
62
-
63
-
64
-
65
-
66
-
67
-
68
-
69
-
70
-
71
-
72
-
73
-
74
-
75
-
76
-
77
-
78
-
79
-
80
-
81
-
82
-
83
-
84
-
85
-
86
-
87
-
88
-
89
-
90
-
91
-
92
-
93
-
94
-
95
-
96
-
97
-
98
-
99
-
100
-
101
-
102
-
 103
103 -
 104
104 -
 105
105 -
 106
106 -
 107
107 -
 108
108 -
 109
109 -
 110
110 -
 111
111 -
 112
112 -
 113
113 -
114
-
115
-
116
-
117
-
118
-
119
-
120
-
121
-
122
-
123
-
124
-
125
-
126
-
127
-
128
-
129
-
130
-
131
 |
 |