Pioneer SC-79 Owner's Manual - Page 16
Mcacc Setup Mic Jack
 |
View all Pioneer SC-79 manuals
Add to My Manuals
Save this manual to your list of manuals |
Page 16 highlights
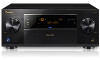
02 Controls and displays Front panel 1 2 3 4 INPUT SELECTOR STANDBY / ON ADVANCED MCACC FL OFF 35 HDMI iPod iPhone iPad 6 MASTER VOLUME 8 9 10 11 12 13 14 15 AUDIO PARAMETER TUNE VIDEO PARAMETER ZONE 2 ON/OFF MULTI-ZONE CONTROL SPEAKERS iPod iPhone iPad DIRECT CONTROL AUTO/ALC/ DIRECT HOME THX BAND TUNER EDIT ZONE 3 ENTER ON/OFF 7 PRESET PRESET HOME MENU RETURN HDZONE ON/OFF PHONES MCACC SETUP MIC with USB 5V 2.1 A HDMI 5 INPUT/ MHL (5V 0.9 A) TUNE (HDMI) 16 17 18 19 20 21 1 u STANDBY/ON This switches between standby and on for this receiver. 2 INPUT SELECTOR dial Use to select an input function. 3 Indicators ! ADVANCED MCACC - Lights when EQ is set to ON in the AUDIO PARAMETER menu (page 77). ! FL OFF - Lights when "off" (nothing displayed) is selected with the display's dimmer adjustment (page 83). ! HDMI - Blinks when connecting an HDMI-equipped component; lights when the component is connected (page 32). ! iPod iPhone iPad - Lights to indicate iPod/iPhone/iPad is connected (page 42). 4 Character display See Display on page 15. 5 Remote sensor Receives the signals from the remote control (page 10). 6 MASTER VOLUME dial 7 Front panel controls To access the front panel controls, catch the sides of the door with your fingers and pull forward. ISNEPLUETCTOR STANDBY /ON MVOALSUTMERE 8 AUDIO PARAMETER Use to access the Audio options (page 77). 9 i/j/k/l (TUNE/PRESET) /ENTER Use the arrow buttons when setting up your Home Menu. Use TUNE i/j to find radio frequencies and use PRESET k/l to find preset stations (page 56). 10 VIDEO PARAMETER Use to access the Video options (page 79). 11 MULTI-ZONE controls If you've made MULTI-ZONE connections (page 39) use these controls to control the sub zone from the main zone (page 81). 12 SPEAKERS Use to change the speaker terminal (page 81). 13 iPod iPhone iPad DIRECT CONTROL Change the receiver's input to the iPod and enable iPod operations on the iPod (page 53). 14 Listening mode buttons ! AUTO SURR/ALC/STREAM DIRECT - Switches between Auto Surround (page 61), Auto Level Control and Stream Direct mode (page 63). ! HOME THX - Press to select a Home THX listening mode (page 62). 15 TUNER controls ! BAND - Switches between AM and FM radio bands (page 56). ! TUNER EDIT - Use with TUNE i/j, PRESET k/l and ENTER to memorize and name stations for recall (page 57). 16 HOME MENU Use to access the Home Menu (pages 50, 48, 73, 93 and 101). 17 RETURN Press to confirm and exit the current menu screen. 18 PHONES jack Use to connect headphones. When the headphones are connected, there is no sound output from the speakers. 19 MCACC SETUP MIC jack Use to connect the supplied microphone (page 47). 16
-
 1
1 -
2
-
3
-
4
-
5
-
6
-
7
-
8
-
9
-
10
-
 11
11 -
 12
12 -
 13
13 -
 14
14 -
 15
15 -
 16
16 -
 17
17 -
 18
18 -
 19
19 -
 20
20 -
 21
21 -
22
-
23
-
24
-
25
-
26
-
27
-
28
-
29
-
30
-
31
-
32
-
33
-
34
-
35
-
36
-
37
-
38
-
39
-
40
-
41
-
42
-
43
-
44
-
45
-
46
-
47
-
48
-
49
-
50
-
51
-
52
-
53
-
54
-
55
-
56
-
57
-
58
-
59
-
60
-
61
-
62
-
63
-
64
-
65
-
66
-
67
-
68
-
69
-
70
-
71
-
72
-
73
-
74
-
75
-
76
-
77
-
78
-
79
-
80
-
81
-
82
-
83
-
84
-
85
-
86
-
87
-
88
-
89
-
90
-
91
-
92
-
93
-
94
-
95
-
96
-
97
-
98
-
99
-
100
-
101
-
102
-
103
-
104
-
105
-
106
-
107
-
108
-
109
-
110
-
111
-
112
-
113
-
114
-
115
-
116
-
117
-
118
-
119
-
120
-
121
-
122
-
123
-
124
-
125
-
126
-
127
-
128
-
129
-
130
-
131
-
132
-
133
-
134
-
135
 |
 |
