Pioneer SX-10AE Instruction Manual English - Page 7
Remote Controller
 |
View all Pioneer SX-10AE manuals
Add to My Manuals
Save this manual to your list of manuals |
Page 7 highlights
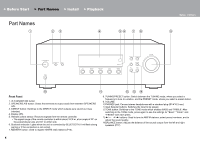
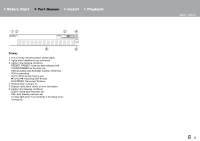
> Before Start > Part Names > Install > Playback Setup | Others Remote Controller 1. Í STANDBY/ON button 2. SLEEP button: Set the sleep timer (P20). 3. INPUT SELECTOR buttons: Switches the input to be played. 4. Numbered buttons 5. DIRECT TUNING button: Use to select the number of a preset station or to directly input the frequency of the station. 6. button: Temporarily mutes audio. Press again to cancel muting. 7. VOLUME buttons 8. Cursors (Up / Down / Left / Right), ENTER button: Select the item with the cursors and press ENTER to confirm. 9. SETUP button: You can show advanced setting items on the display to provide you with an even better experience (P18). 10.BASS buttons: Enhance or moderate the bass range (P17). 11. TREBLE buttons: Enhance or moderate the treble range (P17). 12.DISPLAY button: Switches the information on the display. 13.DIMMER button: You can adjust the brightness of the display in three steps. It cannot be turned off completely. 14. buttons: Select the input to be played. The input changes CD NETWORK LINE 1 LINE 2 FM AM BLUETOOTH each time you press the button. 15.CLEAR button: Deletes all characters you have entered when entering text. 16.PAIRING button: Used to connect to another BLUETOOTH wireless technology enabled device (P12). 17.PRESET buttons: Used to select AM/FM radio stations (P15). 18.RETURN button: Returns the display to the previous state during setting. 19.DIRECT button: Switches to the DIRECT mode which outputs pure sound as it was intended (P17). 20.TONE button: Switches to the TONE mode which enables BASS and TREBLE (P17). En 7
-
 1
1 -
 2
2 -
 3
3 -
 4
4 -
 5
5 -
 6
6 -
 7
7 -
 8
8 -
 9
9 -
 10
10 -
 11
11 -
 12
12 -
13
-
14
-
15
-
16
-
17
-
18
-
19
-
20
-
21
-
22
-
23
-
24
-
25
-
26
-
27
-
28
 |
 |
