Pioneer VREC-DZ700DC Owners Manual - Page 18
Turn the vehicle engine on to display the recording screen.
 |
View all Pioneer VREC-DZ700DC manuals
Add to My Manuals
Save this manual to your list of manuals |
Page 18 highlights
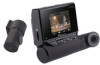
English 5 Route the power cable, 2nd camera connection cable and AV cable to the passenger seat side. Main Unit Connection cable 2nd camera 6 Connect the power cable and AV cable. → "Connecting the Power Cable" ΞΫηαϦʔ 7 Turnιtέhοeτvehicle engine on to display the recording screen. 8 Adjuγ ిsΨ ݯt ʔ έthϥ ʔeΠ ϒλ ϧaʔngle of the lens so that video outside and inside the vehicle is properly displayed. Turn this part to adjust the lens angle. Turn the angle adjustment jog dial to adjust the lens angle. Before driving, turn the lens of this product towards the outside of the vehicle. This product restarts when the lens angle is moved from the outside of the vehicle to the inside, and vice versa. To switch between camera video from this product and video from the 2nd camera, press the button. → "Function Buttons" Note A protective film is applied to the lens when the product is purchased. Peel off this film. − 18 −
-
 1
1 -
2
-
3
-
4
-
5
-
6
-
7
-
8
-
9
-
10
-
11
-
12
-
 13
13 -
 14
14 -
 15
15 -
 16
16 -
 17
17 -
 18
18 -
 19
19 -
 20
20 -
 21
21 -
 22
22 -
 23
23 -
24
-
25
-
26
-
27
-
28
-
29
-
30
-
31
-
32
-
33
-
34
-
35
-
36
-
37
-
38
-
39
-
40
 |
 |
