Pioneer VREC-DZ700DC Owners Manual - Page 21
 Part Names
 |
View all Pioneer VREC-DZ700DC manuals
Add to My Manuals
Save this manual to your list of manuals |
Page 21 highlights
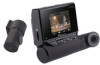
English Part Names Top 1 Left side Front 4 5 2 3 Right side 69 a b 7 Back 8 c 2nd camera e d f 1 AV Output Terminal 2 Power Port Connect the power cable and AV cable. 3 2nd Camera Connection Terminal Connect to the 2nd camera connection terminal (e) using the 2nd camera connection cable. 4 microSD Card Slot 5 System Indicator 6 LCD 7 Function Buttons 8 Lens Pioneer polarized filter AD-PLF100 (sold separately) can help reduce reflections of the dashboard onto the windshield, and enable the capture of high-contrast videos. 9 Speaker a Microphone b Reset Button Press this button with the tip of a ballpoint pen to reset this product. c Angle Adjustment Jog Dial The angle of the lens can be adjusted by turning this dial. d Mounting Bracket e Connection Terminal f Lens − 21 −
-
 1
1 -
2
-
3
-
4
-
5
-
6
-
7
-
8
-
9
-
10
-
11
-
12
-
13
-
14
-
15
-
 16
16 -
 17
17 -
 18
18 -
 19
19 -
 20
20 -
 21
21 -
 22
22 -
 23
23 -
 24
24 -
 25
25 -
 26
26 -
27
-
28
-
29
-
30
-
31
-
32
-
33
-
34
-
35
-
36
-
37
-
38
-
39
-
40
 |
 |
