Pioneer VSX-521-K Owner's Manual - Page 17
Adapter To The Adapter Port - bluetooth
 |
UPC - 884938133043
View all Pioneer VSX-521-K manuals
Add to My Manuals
Save this manual to your list of manuals |
Page 17 highlights
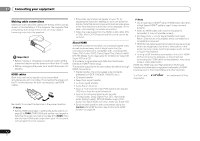
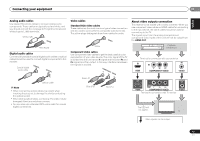
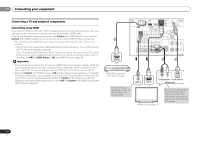
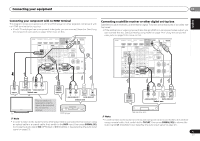
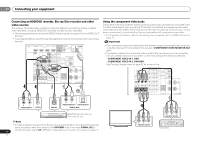
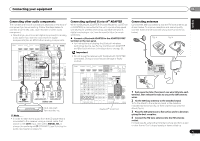
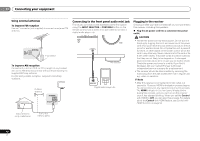
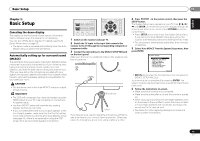
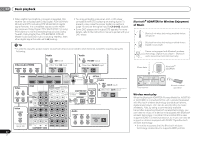
Connecting your equipment 02 Connecting other audio components The number and kind of connections depends on the kind of component you're connecting. Follow the steps below to connect a CD-R, MD, DAT, tape recorder or other audio component. • Note that you must connect digital components to analog audio jacks if you want to record to/from digital components (like an MD) to/from analog components. HDMI DVR/BDR IN DVD IN BD IN VIDEO IN OUT COAXIAL IN 1 IN 1 ASSIGNABLE IN OPTICAL 2 ASSIGNABLE VIDEO (CD) AUDIO SURR BACK/ DVR/BDR CD-R/TAPE FRONT HEIGHT (TV/SAT) (CD-R/TAPE) MONITOR TV/SAT BD OUT IN IN OUT DVR/ BDR OUT IN 1 (DVD) ASSIGNABLE IN DVD IN IN L ADAPTER PORT (Single) (OUTPUT 5 V PRE OUT 0.1 A MAX) R ANTENNA FM CD UNBAL 75 L AM LOOP IN R FRONT L R CEN IN 2 (DVR/ BDR) L IN IN MONITOR OUT Y PB PR COMPONENT VIDEO TV/SAT BD R SUBWOOFER DVD PRE OUT Class 2 Wiring SPEAKERS A R REC L ANALOG AUDIO IN R L COAXIAL OPTICAL ANALOG AUDIO OUT DIGITAL AUDIO OUT Select one CD-R, MD, DAT, Tape recorder, etc. Note • In order to listen to the audio from the CD player that is connected to this receiver using a coaxial cable, first, switch to the CD-R input, then press SIGNAL SEL to choose the audio signal C1 (COAXIAL1) (see Selecting the audio input signal on page 21). Connecting optional Bluetooth® ADAPTER When the Bluetooth ADAPTER (Pioneer Model No. AS-BT100 or AS-BT200) is connected to this unit, a product equipped with Bluetooth wireless technology (portable cell phone, digital music player, etc.) can be used to listen to music wirelessly. Connect a Bluetooth ADAPTER to the ADAPTER PORT terminal on the rear panel. • For instructions on playing the Bluetooth wireless technology device, see Pairing the Bluetooth ADAPTER and Bluetooth wireless technology device on page 23. Important • Do not move the receiver with the Bluetooth ADAPTER connected. Doing so could cause damage or faulty contact. HDMI DVR/BDR IN DVD IN BD IN VIDEO IN OUT COAXIAL IN 1 IN 1 ASSIGNABLE IN OP 2 ASS VIDEO (CD) AUDIO SURR BACK/ DVR/BDR CD-R/TAPE FRONT HEIGHT (TV/SAT) (CD-R/TAPE MONITOR TV/SAT BD OUT IN IN OUT DVR/ BDR OUT IN 1 (DVD) ASSIGNABLE IN DVD IN IN L ADAPTER PORT (Single) (OUTPUT 5 V PRE OUT 0.1 A MAX) R ANTENNA FM CD UNBAL 75 L AM LOOP IN R FRONT L R IN 2 (DVR/ BDR) L IN IN MONITOR OUT Y PB PR COMPONENT VIDEO TV/SAT BD R SUBWOOFER DVD PRE OUT Class 2 Wiring SPEAKE Bluetooth® ADAPTER Connecting antennas Connect the AM loop antenna and the FM wire antenna as shown below. To improve reception and sound quality, connect external antennas (see Using external antennas below). fig. a fig. b 4 FM UNBAL 75 ANTENNA AM LOOP 1 2 3 1 Push open the tabs, then insert one wire fully into each terminal, then release the tabs to secure the AM antenna wires. 2 Fix the AM loop antenna to the attached stand. To fix the stand to the antenna, bend in the direction indicated by the arrow (fig. a) then clip the loop onto the stand (fig. b). 3 Place the AM antenna on a flat surface and in a direction giving the best reception. 4 Connect the FM wire antenna into the FM antenna socket. For best results, extend the FM antenna fully and fix to a wall or door frame. Don't drape loosely or leave coiled up. 17 En English Français Español
-
 1
1 -
2
-
3
-
4
-
5
-
6
-
7
-
8
-
9
-
10
-
11
-
 12
12 -
 13
13 -
 14
14 -
 15
15 -
 16
16 -
 17
17 -
 18
18 -
 19
19 -
 20
20 -
 21
21 -
 22
22 -
23
-
24
-
25
-
26
-
27
-
28
-
29
-
30
-
31
-
32
-
33
-
34
-
35
-
36
-
37
-
38
-
39
-
40
-
41
-
42
-
43
-
44
-
45
-
46
-
47
-
48
-
49
-
50
-
51
-
52
-
53
-
54
-
55
-
56
-
57
-
58
-
59
-
60
-
61
-
62
-
63
-
64
-
65
-
66
-
67
-
68
-
69
-
70
-
71
-
72
-
73
-
74
-
75
-
76
-
77
-
78
-
79
-
80
-
81
-
82
-
83
-
84
-
85
-
86
-
87
-
88
-
89
-
90
-
91
-
92
-
93
-
94
-
95
-
96
-
97
-
98
-
99
-
100
-
101
-
102
-
103
-
104
-
105
-
106
-
107
-
108
-
109
-
110
-
111
-
112
-
113
-
114
-
115
-
116
-
117
-
118
-
119
-
120
 |
 |
