Pioneer VSX-819H-K Owner's Manual - Page 17
Connecting up, Connecting other audio, components - how to set a receiver
 |
UPC - 012562946702
View all Pioneer VSX-819H-K manuals
Add to My Manuals
Save this manual to your list of manuals |
Page 17 highlights
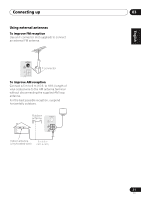
English Deutsch Français Italiano Nederlands Español Connecting up 03 Connecting other audio components The number and kind of connections depends on the kind of component you're connecting.1 Follow the steps below to connect a CD-R, MD, DAT, tape recorder or other audio component. 1 If your component has a digital output, connect this to a digital input on the receiver as shown. The example shows an optical connection to the DIGITAL OPTICAL IN 1 (CD-R/TAPE) input. 2 If necessary, connect the analog audio outputs of the component to a set of spare audio inputs on this receiver. You'll need to make this connection for components without a digital output, or if you want to record from a digital component. Use a stereo RCA phono cable as shown. 3 If you're connecting a recorder, connect the analog audio outputs to the analog audio inputs on the recorder. The example shows an analog connection to the CD-R/TAPE analog output jack using a stereo RCA phono cable. This receiver R AUX L IN HDMI BD/DVD IN OUT CD-R/TAPE IN CD IN ZO OU L TV/SAT IN IR IN R OUT DVR/VCR IN TV/SAT IN L DVR/VCR COAXIAL IN IN 1 (CD) OPTICAL IN 2 OUT (AUX) ASSIGNABLE MO ANTENNA R SURROUND CENTER FRONT L SIRIUS IN FM UNBAL 75 Ω IN 1 (CD-R/TAPE) DIGITAL R ASSIGNABLE SUBWOOFER BD/DVD IN 1 - 2 AUDIO BD/DVD MULTI CH IN AM LOOP C 1 3 2 OPTICAL COAXIAL DIGITAL OUT R IN L REC AUDIO IN R OUT L PLAY AUDIO OUT CD-R, MD, DAT, Tape recorder, etc. Note 1 Note that you must connect digital components to analog audio jacks if you want to record to/from digital components (like an MD) to/from analog components. 17 En
-
 1
1 -
2
-
3
-
4
-
5
-
6
-
7
-
8
-
9
-
10
-
11
-
 12
12 -
 13
13 -
 14
14 -
 15
15 -
 16
16 -
 17
17 -
 18
18 -
 19
19 -
 20
20 -
 21
21 -
 22
22 -
23
-
24
-
25
-
26
-
27
-
28
-
29
-
30
-
31
-
32
-
33
-
34
-
35
-
36
-
37
-
38
-
39
-
40
-
41
-
42
-
43
-
44
-
45
-
46
-
47
-
48
-
49
-
50
-
51
-
52
-
53
-
54
-
55
-
56
-
57
-
58
-
59
-
60
-
61
-
62
-
63
-
64
-
65
-
66
-
67
-
68
-
69
-
70
-
71
-
72
-
73
-
74
-
75
-
76
-
77
-
78
-
79
-
80
-
81
-
82
-
83
-
84
-
85
-
86
-
87
-
88
-
89
-
90
-
91
-
92
-
93
-
94
-
95
-
96
-
97
-
98
-
99
-
100
-
101
-
102
-
103
-
104
-
105
-
106
-
107
-
108
-
109
-
110
-
111
-
112
-
113
-
114
-
115
-
116
-
117
-
118
-
119
-
120
-
121
-
122
-
123
-
124
-
125
-
126
-
127
-
128
-
129
-
130
-
131
-
132
-
133
-
134
-
135
-
136
-
137
-
138
-
139
-
140
-
141
-
142
-
143
-
144
-
145
-
146
-
147
-
148
-
149
-
150
-
151
-
152
-
153
-
154
-
155
-
156
-
157
-
158
-
159
-
160
-
161
-
162
-
163
-
164
-
165
-
166
-
167
-
168
-
169
-
170
-
171
-
172
-
173
-
174
-
175
-
176
-
177
-
178
-
179
-
180
-
181
-
182
-
183
-
184
-
185
-
186
-
187
-
188
-
189
-
190
-
191
-
192
-
193
-
194
-
195
-
196
-
197
-
198
-
199
-
200
-
201
-
202
-
203
-
204
-
205
-
206
-
207
-
208
-
209
-
210
-
211
-
212
-
213
 |
 |
