Pioneer VSX-819H-K Owner's Manual - Page 51
Controlling the rest of your, system - remote code
 |
UPC - 012562946702
View all Pioneer VSX-819H-K manuals
Add to My Manuals
Save this manual to your list of manuals |
Page 51 highlights
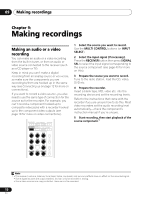
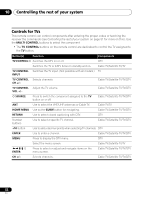
English Deutsch Français Italiano Nederlands Español Controlling the rest of your system 10 Chapter 10: Controlling the rest of your system Setting the remote to control other components Most components can be assigned to one of the MULTI CONTROL buttons using the component's manufacturer preset code stored in the remote. However, please note that there are cases where only certain functions may be controllable after assigning the proper preset code, or the codes for the manufacturer in the remote control will not work for the model that you are using.1 Note • You can cancel or exit any of the steps by pressing RECEIVER. • After one minute of inactivity, the remote automatically exits the operation. 1 While pressing the RECEIVER button, press and hold the '1' button for three seconds. 2 Press the MULTI CONTROL button for the component you want to control. The component can be assigned to the BD, TV, DVR or VIDEO button. 3 Use the number buttons to enter the preset code. You can find the preset codes on page 55. If the correct code has been input the power of the component being input will turn on or off. The power of the component being input will only turn on or off if that component is able to be turned on directly by remote control. 4 Repeat steps 2 through 3 to try a different code, or to enter a code for another component you want to control. 5 When you're done, press RECEIVER. Selecting preset codes directly RECEIVER ZONE 2 ON/OFF TV CONTROL INPUT BD TV DVR CD CD-R TUNER CH VIDEO MULTI IN AUX VOL HDD 1 DVD 2 VCR DISPLAY 3 S.RETRIEVER EQ CH SELECT SLEEP 4 5 6 CH SB CH PHASE 7 8 DIMMER SPEAKERS +10 0 D.ACCESS MIDNIGHT 9 CH SHIFT ENTER Clearing all the remote control settings You can clear all presets and restore the factory default settings. • While pressing the RECEIVER button, press and hold the '0' button for three seconds. Note 1 TV codes (for example, codes for TV, CATV, Satellite TV or DTV) can only be assigned to the TV button. 51 En
-
 1
1 -
2
-
3
-
4
-
5
-
6
-
7
-
8
-
9
-
10
-
11
-
12
-
13
-
14
-
15
-
16
-
17
-
18
-
19
-
20
-
21
-
22
-
23
-
24
-
25
-
26
-
27
-
28
-
29
-
30
-
31
-
32
-
33
-
34
-
35
-
36
-
37
-
38
-
39
-
40
-
41
-
42
-
43
-
44
-
45
-
 46
46 -
 47
47 -
 48
48 -
 49
49 -
 50
50 -
 51
51 -
 52
52 -
 53
53 -
 54
54 -
 55
55 -
 56
56 -
57
-
58
-
59
-
60
-
61
-
62
-
63
-
64
-
65
-
66
-
67
-
68
-
69
-
70
-
71
-
72
-
73
-
74
-
75
-
76
-
77
-
78
-
79
-
80
-
81
-
82
-
83
-
84
-
85
-
86
-
87
-
88
-
89
-
90
-
91
-
92
-
93
-
94
-
95
-
96
-
97
-
98
-
99
-
100
-
101
-
102
-
103
-
104
-
105
-
106
-
107
-
108
-
109
-
110
-
111
-
112
-
113
-
114
-
115
-
116
-
117
-
118
-
119
-
120
-
121
-
122
-
123
-
124
-
125
-
126
-
127
-
128
-
129
-
130
-
131
-
132
-
133
-
134
-
135
-
136
-
137
-
138
-
139
-
140
-
141
-
142
-
143
-
144
-
145
-
146
-
147
-
148
-
149
-
150
-
151
-
152
-
153
-
154
-
155
-
156
-
157
-
158
-
159
-
160
-
161
-
162
-
163
-
164
-
165
-
166
-
167
-
168
-
169
-
170
-
171
-
172
-
173
-
174
-
175
-
176
-
177
-
178
-
179
-
180
-
181
-
182
-
183
-
184
-
185
-
186
-
187
-
188
-
189
-
190
-
191
-
192
-
193
-
194
-
195
-
196
-
197
-
198
-
199
-
200
-
201
-
202
-
203
-
204
-
205
-
206
-
207
-
208
-
209
-
210
-
211
-
212
-
213
 |
 |