Pioneer VSX-935 7.2-Channel Network AV Receiver Instruction Manual English - Page 105
Connecting a transmitter for playback, Connections, Setting Up, Playing Back
 |
View all Pioneer VSX-935 7.2-Channel Network AV Receiver manuals
Add to My Manuals
Save this manual to your list of manuals |
Page 105 highlights
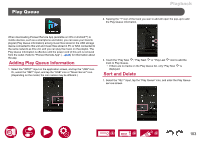
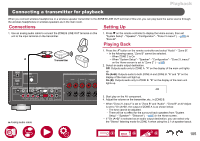
Playback Connecting a transmitter for playback When you connect wireless headphones or a wireless speaker transmitter to the ZONE B LINE OUT terminal of this unit, you can play back the same source through the wireless headphones or wireless speakers as in the main room. Connections Setting Up 1. Use an analog audio cable to connect the ZONE B LINE OUT terminal on this unit to the input terminal on the transmitter. 1. Press on the remote controller to display the Home screen, then set "System Setup" - "Speaker" -"Configuration" - "Zone 2 Lineout" ( →p115) to "Zone B". Playing Back a Transmitter 1. Press the button on the remote controller and select "Audio" - "Zone B". • In the following cases, "Zone B" cannot be selected. - When ZONE 2 is On - When "System Setup" - "Speaker" - "Configuration" - "Zone 2 Lineout" on the Home screen is set to "Zone 2" ( →p115) 2. Select an audio output destination. Off: Outputs audio only to ZONE A. "A" on the display of the main unit lights up. On (A+B): Outputs audio to both ZONE A and ZONE B. "A" and "B" on the display of the main unit light up. On (B): Outputs audio only to ZONE B. "B" on the display of the main unit lights up. a Analog audio cable 3. Start play on the AV component. 4. Adjust the volume on the transmitter, etc., in ZONE B. • When "Zone 2 Lineout" is set to "Zone B" and "Audio" - "Zone B" at AV Adjust is set to "On (A+B)", the output of ZONE A is as shown below. - The tone cannot be adjusted. - There will be no effect for the surround back speakers from "System Setup" - "Speaker" - "Distance" ( →p117) in the Home screen. • If "On (A+B)" is selected as an audio output destination, you can select only the "Stereo" listening mode for ZONE A when using the 2.1 ch speaker layout. 105
-
 1
1 -
2
-
3
-
4
-
5
-
6
-
7
-
8
-
9
-
10
-
11
-
12
-
13
-
14
-
15
-
16
-
17
-
18
-
19
-
20
-
21
-
22
-
23
-
24
-
25
-
26
-
27
-
28
-
29
-
30
-
31
-
32
-
33
-
34
-
35
-
36
-
37
-
38
-
39
-
40
-
41
-
42
-
43
-
44
-
45
-
46
-
47
-
48
-
49
-
50
-
51
-
52
-
53
-
54
-
55
-
56
-
57
-
58
-
59
-
60
-
61
-
62
-
63
-
64
-
65
-
66
-
67
-
68
-
69
-
70
-
71
-
72
-
73
-
74
-
75
-
76
-
77
-
78
-
79
-
80
-
81
-
82
-
83
-
84
-
85
-
86
-
87
-
88
-
89
-
90
-
91
-
92
-
93
-
94
-
95
-
96
-
97
-
98
-
99
-
 100
100 -
 101
101 -
 102
102 -
 103
103 -
 104
104 -
 105
105 -
 106
106 -
 107
107 -
 108
108 -
 109
109 -
 110
110 -
111
-
112
-
113
-
114
-
115
-
116
-
117
-
118
-
119
-
120
-
121
-
122
-
123
-
124
-
125
-
126
-
127
-
128
-
129
-
130
-
131
-
132
-
133
-
134
-
135
-
136
-
137
-
138
-
139
-
140
-
141
-
142
-
143
-
144
-
145
-
146
-
147
-
148
-
149
-
150
-
151
-
152
-
153
-
154
-
155
-
156
-
157
-
158
-
159
-
160
-
161
-
162
-
163
-
164
-
165
-
166
-
167
-
168
-
169
-
170
-
171
-
172
-
173
-
174
-
175
-
176
-
177
-
178
-
179
-
180
-
181
-
182
 |
 |
