Polk Audio Atrium Sat300 User Guide - Page 11
Mounting Template
 |
View all Polk Audio Atrium Sat300 manuals
Add to My Manuals
Save this manual to your list of manuals |
Page 11 highlights
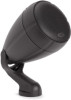
BRACKET MOUNT For more solid mounting, screw the bracket directly into a weight-bearing stud on the mounting surface. To bracket mount the SAT300, you will need the following hardware: • SAT300 speaker • Rubber bumper (optional) • (2) #6 pan head screws • SAT300 Mounting Template Instructions 1. Determine where you want to mount the speaker. 2. Hold the mounting template to the mounting surface and mark the screw hole locations with a pencil. 3. Use an 1/8" drill bit and drill the mounting holes (if necessary). NOTE: Use wall anchors if mounting the speaker into drywall. 4. Loosen the knob on the back of the speaker so it can swivel. NOTE: The speaker bracket has a notch for the speaker wires, which allows you to run the speaker wires up the mounting surface, or you may drill a hole in the mounting surface and run the speaker wires through the hole. 5. Place the rubber bumper underneath the bracket (optional). 6. Hold the speaker to the mounting surface. 7. Attach the speaker assembly using the supplied #6 pan head screws. 8. Once the loudspeaker has been adjusted to the desired angle, tighten the knob on the back of the loudspeaker to hold it in place. Mounting Template WARNING: Aiming the SAT300 to an angle greater than 45 degrees to the horizontal may result in water buildup inside the grille that could cause damage to the speaker, especially during cold weather when freezing may occur. Polk Audio Customer Service 800-377-7655 (Outside USA & Canada: +1 410-358-3600)
-
 1
1 -
2
-
3
-
4
-
5
-
 6
6 -
 7
7 -
 8
8 -
 9
9 -
 10
10 -
 11
11 -
 12
12 -
 13
13 -
 14
14 -
 15
15 -
 16
16 -
17
-
18
-
19
-
20
-
21
-
22
 |
 |
