Polk Audio Atrium Sat300 User Guide - Page 21
Atrium®, Sat300
 |
View all Polk Audio Atrium Sat300 manuals
Add to My Manuals
Save this manual to your list of manuals |
Page 21 highlights
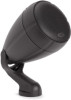
ATRIUM® SAT300 Mounting Template-Gabarit D'installation Use this template to mount an Atrium SAT300 to a solid surface, such as a post or wall. 1. Using the mounting template, mark the screw hole ·locations with a pencil. 2. Drill the mounting holes (if necessary). NOTE: Use wall anchors (not supplied) if mounting onto drywall. 3. Hold the SAT300 assembly to the mounting surface and swivel the speaker so that it doesn't block the bracket screw holes. 4. Tighten the knob to hold speaker in place and sink two #6 panhead screws. NOTE: The optional rubber bumper can be used to provide mechanical isolation between the Atrium SAT300 and the mounting surface. 5. Swivel the Atrium SAT300 into the desired position. 6. Tighten the knob to secure speaker into position. Utilisez ce gabarit pour installer une enceinte Atrium SAT300 sur une surface rigide, comme un mur ou un poteau. 1. Utilisez le gabarit d'installation et un crayon pour marquer !'emplacement des trous de vis. 2. Percez les trous (si necessaire). NOTE: Utilisez des chevilles d'ancrage (non fournies) pour installation sur placoplatre. 3. Tenez l'enceinte sur la surface d'installation puis pivotez-la pour degager l'acces aux trous de vis du support. 4. Resserrez le bouton pour retenir l'enceinte en place puis a fixez I/ensemble tete cynlindrique #6. NOTE: Le butoir en caoutchouc peut etre utilise pour isolar physiquement l'Atrium SAT300 de la surface d'installation (facultatif). 5. Desserrez le bouton et orientez !'Atrium SAT300 seion vos preferences. 6. Resserrez le bouton pour bloquer l'enceinte en place. Screw location for speaker mounting Position de la vis pour montage de l'enceinte \\\I 2" (5.08cm) I Screw location for speaker mounting Position de la vis pour montage de l'encelnte II I I
-
 1
1 -
2
-
3
-
4
-
5
-
6
-
7
-
8
-
9
-
10
-
11
-
12
-
13
-
14
-
15
-
 16
16 -
 17
17 -
 18
18 -
 19
19 -
 20
20 -
 21
21 -
 22
22
 |
 |
