ProForm 1350 Bike English Manual - Page 19
If you select Standard Wifi Setup
 |
View all ProForm 1350 Bike manuals
Add to My Manuals
Save this manual to your list of manuals |
Page 19 highlights
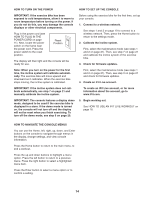
HOW TO USE THE SETTINGS MODE The console features a settings mode that allows you to connect the console to your own wireless network and to log in to your iFit Live account. The settings mode also allows you to select the unit of measurement, to turn on and turn off the display demo mode, to turn on and turn off the incline lockout, and to select a gearing option. You may also be able to select a language. 1. Select the settings mode. Turn on the console (see step 1 on page 15). Next, select the main menu (see step 2 on page 15). Then, select Settings. The settings menu will appear in the display. 2. Connect to a wireless network. From the settings menu, select WiFi. Then, select Standard Wifi Setup or Advanced Wifi Setup. The display will inform you when the console has connected to your wireless network. Press the Enter button to close the standard setup mode. If you select Advanced Wifi Setup, a list of wireless networks will appear in the display. Select the desired network. Note: It may take a few moments for the list of networks to appear. Note: You will need to know your network name (SSID), your network password, your IP address, your netmask, your gateway address, and your global DNS server for the advanced setup. The keyboard will then appear in the display. Using the left, right, up, down and Enter buttons, enter your password (passphrase) and select Done. Repeat these actions to enter your IP address, your netmask, your gateway address, and your global DNS. Note: You must have your own wireless network and an 802.11b/n router with SSID broadcast enabled (hidden networks are not supported). If you are having problems connecting to the selected network, make sure that you have entered case-sensitive information correctly. The iFit Live mode supports unsecured and secured (WEP, WPA, and WPA2) encryption. A broadband connection is recommended; performance depends on connection speed. If you select Standard Wifi Setup, a list of wireless networks will appear in the display. Select the desired network. Note: It may take a few moments for the list of networks to appear. You will need to know your network name (SSID) for the standard setup. If your network has a password, you will also need to know the password. The keyboard will then appear in the display. Using the left, right, up, down and Enter buttons, enter your password (passphrase) and select Done. Note: If your network does not have a password, simply select Done. If you are having problems connecting to the selected network, make sure that your password is correct. Note: Passwords are case-sensitive. The display will inform you when the console has connected to your wireless network. Press the Enter button to close the advanced setup mode. Note: If you have questions after following these instructions, go to www.iFit.com/support for assistance. 3. Log in to your iFit Live account. From the settings menu, select WiFi. Then, select iFit Live Login. The keyboard will then appear in the display. Using the left, right, up, down and Enter buttons, enter your iFit Live password (passphrase) and select Done. Note: You can switch users within the iFit Live account. From the iFit Live menu, select Select User and select the desired user. To create an iFit Live account, or for more information about the account, go to www.iFit.com. 19
-
 1
1 -
2
-
3
-
4
-
5
-
6
-
7
-
8
-
9
-
10
-
11
-
12
-
13
-
 14
14 -
 15
15 -
 16
16 -
 17
17 -
 18
18 -
 19
19 -
 20
20 -
 21
21 -
 22
22 -
 23
23 -
 24
24 -
25
-
26
-
27
-
28
 |
 |