ProForm 1350 Bike English Manual - Page 21
How To Use The Maintenance Mode
 |
View all ProForm 1350 Bike manuals
Add to My Manuals
Save this manual to your list of manuals |
Page 21 highlights
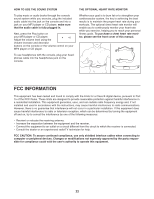
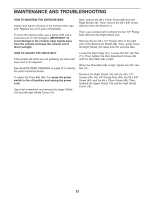
HOW TO USE THE MAINTENANCE MODE 4. Restore the default settings. The console features a maintenance mode that allows you to update the console firmware, restore the default settings, view technical information, perform a network test, and calibrate the incline. 1. Select the settings mode. See step 1 on page 19. From the maintenance menu, select Restore Defaults. Then, press Enter to restore the console to the original settings from the factory. 5. View technical information. From the maintenance menu, select Technical Info. 2. Select the maintenance mode. From the settings menu, select Maintenance. The maintenance menu will appear in the display. If the console is connected to the controller of the exercise bike, the controller dot will be green; if it is not, the dot will flash. View the total number of hours that the exercise bike has been used, the total distance that has been pedaled, and other information. After you view the information, press the Enter button. 6. Perform a network test. If the exercise bike is connected to your wireless network, the network dot will be green; if it is not, the dot will be red. 3. Update the console firmware. For the best results, regularly check for firmware updates. From the maintenance menu, select Firmware Update. Press the Enter button to download the latest firmware for the console. IMPORTANT: To avoid damaging the exercise bike, do not turn off the power while the firmware is being updated. The display will show the progress of the update. When the update is complete, the console will turn off and then turn back on. If it does not, press the power switch on the exercise bike to the off position. Wait for several seconds, and then press the power switch to the reset position. It may take a few minutes for the console to be ready for use. From the maintenance menu, select Network Test. The console will run a network test and check the connection status of the console and the exercise bike. After you view the results of the network test, press the Enter button. 7. Calibrate the incline system of the exercise bike. From the maintenance menu, select Calibrate Incline. Then, press the Enter button to calibrate the incline system. The exercise bike will automatically rise to the maximum incline level, lower to the minimum incline level, and then return to the starting position. This will calibrate the incline system. IMPORTANT: Keep pets, feet, and other objects away from the exercise bike while the incline system is calibrating. In an emergency, press the Enter button to stop the incline calibration. When the incline system is calibrated, press the Enter button. 8. Exit the maintenance mode. To exit the maintenance mode, press the Home button. 21
-
 1
1 -
2
-
3
-
4
-
5
-
6
-
7
-
8
-
9
-
10
-
11
-
12
-
13
-
14
-
15
-
 16
16 -
 17
17 -
 18
18 -
 19
19 -
 20
20 -
 21
21 -
 22
22 -
 23
23 -
 24
24 -
 25
25 -
 26
26 -
27
-
28
 |
 |