ProForm 1350 Bike English Manual - Page 23
Maintenance And Troubleshooting
 |
View all ProForm 1350 Bike manuals
Add to My Manuals
Save this manual to your list of manuals |
Page 23 highlights
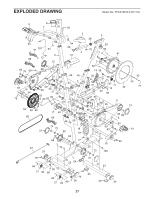
MAINTENANCE AND TROUBLESHOOTING HOW TO MAINTAIN THE EXERCISE BIKE Inspect and tighten all parts of the exercise bike regularly. Replace any worn parts immediately. To clean the exercise bike, use a damp cloth and a small amount of mild detergent. IMPORTANT: To avoid damage to the console, keep liquids away from the console and keep the console out of direct sunlight. Next, remove the #8 x 13mm Screw (88) from the Right Shield (12). Then, remove the #8 x 5/8" Screw (94) from the Left Shield (11). Then, use a socket set to remove the two 1/4" Flange Nuts (99) from the Right Shield (12). Remove the two #8 x 1/2" Screws (95) on the right side of the Electronics Shield (98). Then, gently move the Right Shield (12) away from the exercise bike. HOW TO ADJUST THE DRIVE BELT If the pedals slip while you are pedaling, the drive belt may need to be adjusted. See the EXPLODED DRAWING on page 27 to identify the parts mentioned below. To adjust the Drive Belt (66), first press the power switch to the off position and unplug the power cord. Use a flat screwdriver and remove the Upper Shield (10) and the right Shield Cover (13). Locate the Idler Pulley (37). Loosen the 3/8" Jam Nut (71). Then, tighten the Idler Adjustment Screw (39) until the Drive Belt (66) is tight. When the Drive Belt (66) is tight, tighten the 3/8" Jam Nut (71). Reattach the Right Shield (12) with the #8 x 1/2" Screws (95), the 1/4" Flange Nuts (99), the #8 x 5/8" Screw (94), and the #8 x 13mm Screw (88). Then, reattach the Upper Shield (10) and the right Shield Cover (13). 23
-
 1
1 -
2
-
3
-
4
-
5
-
6
-
7
-
8
-
9
-
10
-
11
-
12
-
13
-
14
-
15
-
16
-
17
-
 18
18 -
 19
19 -
 20
20 -
 21
21 -
 22
22 -
 23
23 -
 24
24 -
 25
25 -
 26
26 -
 27
27 -
 28
28
 |
 |