ProForm 475 Audio Series Treadmill Uk Manual - Page 6
Assembly
 |
View all ProForm 475 Audio Series Treadmill manuals
Add to My Manuals
Save this manual to your list of manuals |
Page 6 highlights
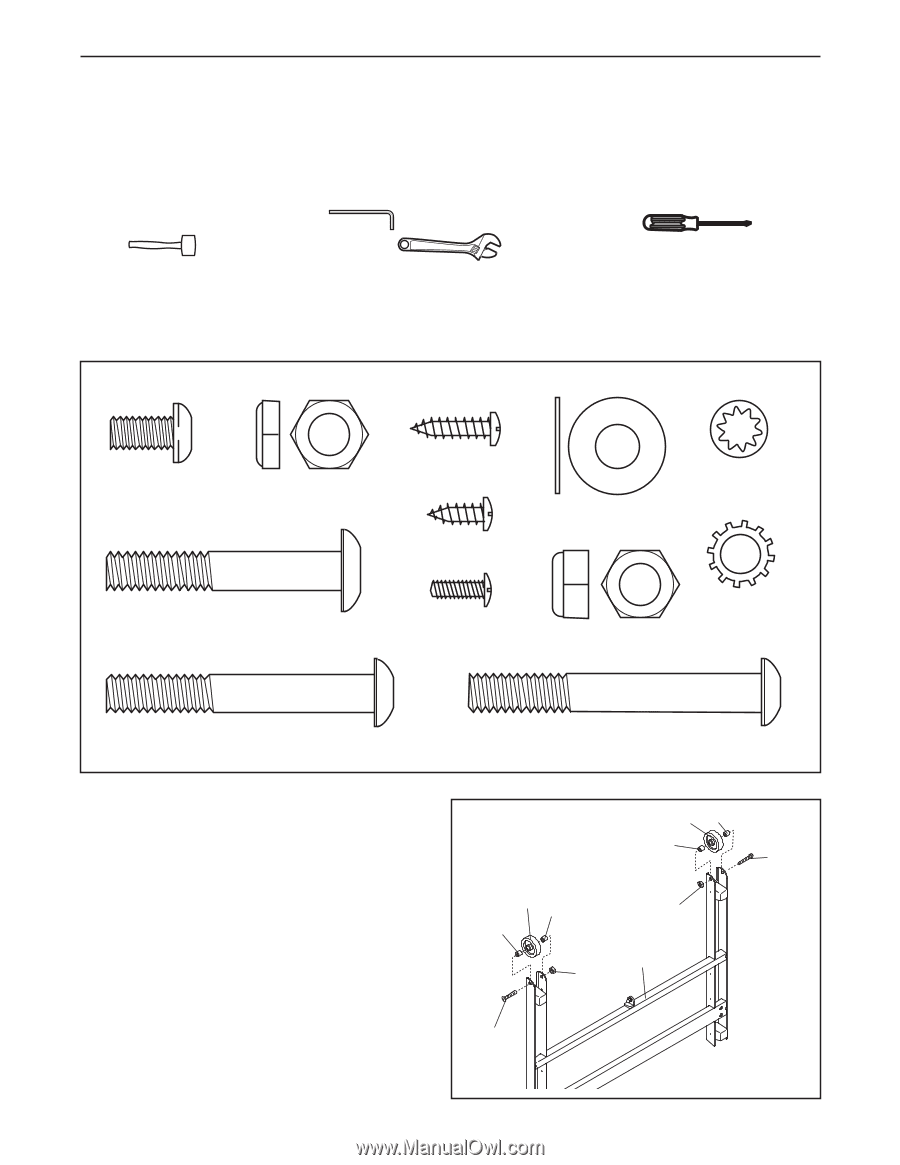
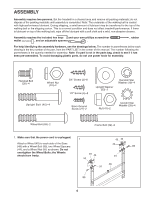
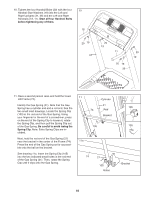
Handrail Bolt (20)-4 ASSEMBLY Assembly requires two persons. Set the treadmill in a cleared area and remove all packing materials; do not dispose of the packing materials until assembly is completed. Note: The underside of the walking belt is coated with high-performance lubricant. During shipping, a small amount of lubricant may be transferred to the top of the walking belt or the shipping carton. This is a normal condition and does not affect treadmill performance. If there is lubricant on top of the walking belt, wipe off the lubLraictcahntSwcritehwa soft cloth and a mild, non-abrasive cleaner. (XXX)-2 Assembly requires the included hex keys and your own phillips screwdriver , rubber ma3l/l4e"t Tek Screw (,5a8n)-d8an adjustable spanner . For help identifying the assembly hardware, see the drawings below. The number in parentheses below each drawing is the key parentheses is the nquumanbteitryonfetheedepdarfot,rfraosmsetmheblPy.ANREoTtneLd:I(cSI9afT5pa)i-nSp2cathrreetwicsennotetrinoftthheispmaartnsubaal.gT,hcehneucmk btoersfeoelloifwiitnhgathse been pre-assembled. To avoid damaging plastic parts, do not use power tools for assembly. 1/4 Handrail Bolt 3/4" Screw (2)-8 Handrail Star (20)-4 Wheel Nut Washer (19)-4 (91)-2 Upright Washer (33)-2 1/2" Screw (6)-8 Upright Bolt (40)-4 H Upright Star W Silver Ground Washer (39)-4 Screw (27)-2 Nut (47)-2 Wheel Bolt (89)-2 Frame Bolt (32)-2 1. Make sure that the power cord is unplugged. Attach a Wheel (45) to each side of the Base (48) with a Wheel Bolt (89), two Wheel Spacers (44), and a Wheel Nut (91) as shown. Do not overtighten the Wheel Bolts; the Wheels should turn freely. Handrail Bolt (20)-4 1 45 44 44 91 45 44 44 89 91 48 Wheel Spacer (44)-4 89 6
-
 1
1 -
 2
2 -
 3
3 -
 4
4 -
 5
5 -
 6
6 -
 7
7 -
 8
8 -
 9
9 -
 10
10 -
 11
11 -
 12
12 -
13
-
14
-
15
-
16
-
17
-
18
-
19
-
20
-
21
-
22
-
23
-
24
-
25
-
26
-
27
-
28
-
29
-
30
-
31
 |
 |