ProForm 475 Audio Series Treadmill Uk Manual - Page 7
Orient the Right Upright 36 and the Base 48
 |
View all ProForm 475 Audio Series Treadmill manuals
Add to My Manuals
Save this manual to your list of manuals |
Page 7 highlights
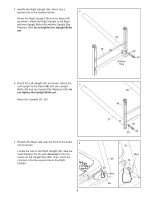
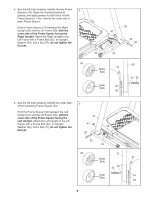
2. Identify the Right Upright (36), which has a square hole in the location shown. 2 Orient the Right Upright (36) and the Base (48) as shown. Attach the Right Upright to the Base with two Upright Bolts (40) and two Upright Star Washers (39); do not tighten the Upright Bolts yet. 3. Orient the Left Upright (31) as shown. Attach the 3 Left Upright to the Base (48) with two Upright Bolts (40) and two Upright Star Washers (39); do not tighten the Upright Bolts yet. Raise the Uprights (31, 36). 4. Position the Base (48) near the front of the tread- 4 mill as shown. Locate the wire in the Right Upright (36). See the inset drawing. Tie the wire securely to the connector on the Upright Wire (28). Then, insert the connector into the square hole in the Right Upright. 7 36 48 39 40 Square Hole 36 48 31 39 39 40 36 28 Wire 48 36 Wire 28
-
 1
1 -
 2
2 -
 3
3 -
 4
4 -
 5
5 -
 6
6 -
 7
7 -
 8
8 -
 9
9 -
 10
10 -
 11
11 -
 12
12 -
13
-
14
-
15
-
16
-
17
-
18
-
19
-
20
-
21
-
22
-
23
-
24
-
25
-
26
-
27
-
28
-
29
-
30
-
31
 |
 |
