ProForm 565 Ekg Instruction Manual - Page 11
Note: If your stereo has an RCA-type AUDIO OUT
 |
View all ProForm 565 Ekg manuals
Add to My Manuals
Save this manual to your list of manuals |
Page 11 highlights
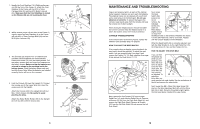
HOW TO CONNECT YOUR CD PLAYER, VCR, OR COMPUTER To use iFIT.com CDs, the elliptical trainer must be connected to your portable CD player, portable stereo, home stereo, or computer with CD player. See pages 14 and 15 for connecting instructions. To use iFIT.com videocassettes, the elliptical trainer must be connected to your VCR. See page 16 for connecting instructions. To use iFIT.com programs directly from our Web site, the elliptical trainer must be connected to your computer. See page 15. HOW TO CONNECT YOUR PORTABLE STEREO Note: If your stereo has an RCA-type AUDIO OUT jack, see instruction A below. If your stereo has a 3.5mm LINE OUT jack, see instruction B. If your stereo has only a PHONES jack, see instruction C. A. Plug one end of the audio cable into the jack beneath the console. Plug the other end of the audio cable into the adapter. Plug the adapter into an AUDIO OUT jack on your stereo. A/B HOW TO CONNECT YOUR PORTABLE CD PLAYER Note: If your CD player has separate LINE OUT and PHONES jacks, see instruction A below. If your CD player has only one jack, see instruction B. A. Plug one end of the audio cable into the jack beneath the console. Plug the other end of the audio cable into the LINE OUT jack on your CD player. Plug your headphones into the PHONES jack. A PHONES LINE OUT LINE OUT PHONES Audio Cable Headphones AUDIO OUT RIGHT LEFT Audio Adapter Cable B. See the drawing above. Plug one end of the audio cable into the jack beneath the console. Plug the other end of the audio cable into the LINE OUT jack on your stereo. Do not use the adaptor. C. Plug one end of the audio cable into the jack beneath the console. Plug the other end of the audio cable into the splitter. Plug the splitter into the PHONES jack on your stereo. Plug your headphones into the other side of the splitter. C B. Plug one end of the audio cable into the jack beneath the console. Plug the other end of the audio cable into the splitter. Plug the splitter into the PHONES jack on your CD player. Plug your headphones into the other side of the splitter. B PHONES PHONES Audio Cable Splitter Audio Cable PHONES Splitter Headphones Headphones 14 HOW TO USE THE MANUAL MODE 1 Turn on the console. Note: The console requires four 1.5V "D" batteries (see assembly step 3 on page 6). To turn on the console, press the On/Reset button or begin pedaling. (See the drawing on page 10 to identify the On/Reset button.) 2 Select the manual mode. Each time the console is turned on, the manual mode will be selected. If a program has been selected, select the manual mode by pressing the Program button repeatedly until the letters RPM appear in the small display. 3 Begin pedaling and change the resistance of the pedals as desired. As you pedal, change the resistance of the pedals by pressing the + and - buttons below the large display. There are ten resistance levels- level 10 is the most challenging. Note: After the buttons are pressed, it will take a few seconds for the resistance to reach the selected setting. 4 Follow your progress with the small display and the large display. The small display will show your pedaling pace, in revolutions per minute (RPM). The indicator bar in the small display will increase or decrease in length as you increase or decrease your pedaling pace. Indicator Bar The upper section of the large display will show the distance you have pedaled and the numbers of calories and fat calories you have burned (see FAT BURNING on page 20 for an explanation of fat calories). The display will change from one number to the next every few seconds. If you use the handgrip pulse sensor, the display will also show your heart rate (see step 5 on page 12). To view only the distance you have pedaled or the Upper Button number of calories or fat calories you have burned, press the upper button on the left side of the large display until only the word DISTANCE, CALORIES, or FAT CALORIES appears in the upper section of the large display; make sure that the word SCAN does not appear. To again view the distance you have pedaled and the numbers of calories and fat calories you have burned, press the upper button until the word SCAN reappears. The centre of the large display will show the elapsed time and your current pace (pace is shown in minutes per mile in this section of the large display). The display will change from one number to the other every few seconds. Note: When a program is selected, the display will show the time remaining in the program instead of the elapsed time. To view only the elapsed time or your pace, press the centre button on the left side of the large display until only the word TIME or PACE appears; make sure that the word SCAN does not appear. To again view both the elapsed time and your pace, press the centre button until the word SCAN reappears. The lower section of the large display will show your pedaling speed and the resistance level. The display will change from one number to the other every few seconds. To view only your pedaling speed or the resistance level, press the lower button on the left side of the large display until only the word SPEED or RESISTANCE appears; make sure that the word SCAN does not appear. To again view both your pedaling speed and the resistance level, press the lower button until the word SCAN reappears. 11
-
 1
1 -
2
-
3
-
4
-
5
-
 6
6 -
 7
7 -
 8
8 -
 9
9 -
 10
10 -
 11
11 -
 12
12
 |
 |
