ProForm Strideclimber 490 Elliptical English Manual - Page 10
Attach the Right Link Arm 39 to the right Crank
 |
View all ProForm Strideclimber 490 Elliptical manuals
Add to My Manuals
Save this manual to your list of manuals |
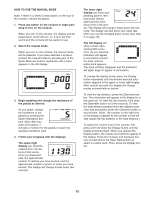
Page 10 highlights
9. Attach the Right Pedal Leg (38) to the Right 9 Upper Body Leg (37) with an M10 x 20mm Button Screw (58), a Small Axle Cover (46), and an M10 x 25mm Washer (52). Attach the Right Link Arm (39) to the right Crank Arm (31) with an M10 x 20mm Button Screw (58), a Small Axle Cover (46), and an M10 x 25mm Washer (52). 39 Repeat this step for the other side of the elliptical exerciser. 31 38 52 46 58 37 52 46 58 10. Tighten the two M8 x 16mm Button Screws (53) 10 and the two M8 x 35mm Button Screws (80) in the Frame (1). Locate the two M4 x 19mm Screws (75) in the sides of the Upright (3). Slide the Water Bottle Holder (6) against the Upright and downward onto the two Screws. Then, tighten the Screws. 3 75 75 6 80 53 1 10
-
 1
1 -
2
-
3
-
4
-
 5
5 -
 6
6 -
 7
7 -
 8
8 -
 9
9 -
 10
10 -
 11
11 -
 12
12 -
 13
13 -
 14
14 -
 15
15 -
16
-
17
-
18
-
19
-
20
-
21
-
22
-
23
-
24
-
25
-
26
-
27
-
28
 |
 |

10
37
38
58
46
52
58
46
52
9.
Attach the Right Pedal Leg (38) to the Right
Upper Body Leg (37) with an M10 x 20mm
Button Screw (58), a Small Axle Cover (46), and
an M10 x 25mm Washer (52).
Attach the Right Link Arm (39) to the right Crank
Arm (31) with an M10 x 20mm Button Screw
(58), a Small Axle Cover (46), and an M10 x
25mm Washer (52).
Repeat this step for the other side of the
elliptical exerciser.
9
31
10. Tighten the two M8 x 16mm Button Screws (53)
and the two M8 x 35mm Button Screws (80) in
the Frame (1).
Locate the two M4 x 19mm Screws (75) in the
sides of the Upright (3). Slide the Water Bottle
Holder (6) against the Upright and downward
onto the two Screws. Then, tighten the Screws.
10
6
75
53
80
39
75
3
1