ProForm Xp 90 Bike Exerciser English Manual - Page 10
How To Use The Manual Mode
 |
View all ProForm Xp 90 Bike Exerciser manuals
Add to My Manuals
Save this manual to your list of manuals |
Page 10 highlights
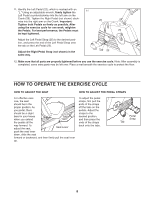
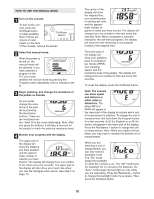
HOW TO USE THE MANUAL MODE 1 Turn on the console. To turn on the con- sole, press the On/Reset button or begin pedaling. Note: If there are On/Reset Button sheets of clear plastic on the face of the console, remove the plastic. 2 Select the manual mode. When the power is turned on, the manual mode will be selected. If you have selected a program or the iFIT.com mode, reselect the manual mode by pressing the Program button repeatedly until no indicators are lit. 3 Begin pedaling, and change the resistance of the pedals as desired. As you pedal, change the resistance of the pedals by pressing the Resistance buttons. There are ten resistance levels-level 10 is the most challenging. Note: After you press the buttons, it will take a moment for the pedals to reach the selected resistance level. 4 Monitor your progress with the display. The upper part of the display will show the distance you have pedaled and the approximate number of calories you have burned. The display will change from one number to the other every few seconds. The upper part of the display will also show your heart rate when you use the handgrip pulse sensor (see step 5 on page 11). The center of the display will show the elapsed time, your pedaling pace in minutes per mile, and the approximate number of grams of carbs you have burned. The display will change from one number to the next every few seconds. Note: When a program is selected (except for the self select program), the display will show the time remaining in the program instead of the elapsed time. The lower part of the display will show your pedaling pace in revolutions per minute (RPM), your pedaling speed, and the resistance level of the pedals. The display will change from one number to the next every few seconds. To reset the display, press the On/Reset button. Note: The console can show speed and distance in either miles or kilometers. The letters MPH or KM/H will appear in the lower part of the display to indicate which unit of measurement is selected. To change the unit of measurement, first hold down the Program button for a few seconds. An E (for English) or an M (for metric) will appear in the lower part of the display. Press the Resistance + button to change the unit of measurement. Note: When you replace the batteries, you may have to reselect the desired unit of measurement. While you are selecting a unit of measurement, you can also select a backlight mode. The "On" mode keeps the backlight on while the console is on. The "Off" mode turns the backlight off. To conserve the batteries, the "Auto" mode keeps the backlight on only while you are exercising. Press the Resistance - button to change the backlight mode if you desire. Then, press the On/Reset button. 10
-
 1
1 -
2
-
3
-
4
-
 5
5 -
 6
6 -
 7
7 -
 8
8 -
 9
9 -
 10
10 -
 11
11 -
 12
12 -
 13
13 -
 14
14 -
 15
15 -
16
-
17
-
18
-
19
-
20
-
21
-
22
-
23
-
24
 |
 |
