Pyle PL1SN104 Instruction Manual - Page 18
System Installation and Wiring
 |
View all Pyle PL1SN104 manuals
Add to My Manuals
Save this manual to your list of manuals |
Page 18 highlights
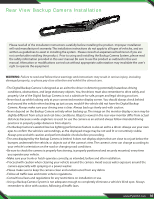
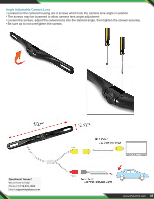
System Installation and Wiring Note: Camera System installation on diesel vehicles may require a slightly different wiring install. Caution: Connecting to other types of electrical systems will cause damage to your vehicle. Please contact the manufacturer if you are unaware of the system type in your vehicle. Refer to the model's power requirements prior to connection and installation. QUICK INSTALLATION: This rearview backup camera system comes with camera and installation wiring. When installing, the camera is preferably to be mounted in the rear of your vehicle (just above the license plate). This kit includes necessary wiring and cable connector accessories sufficient for typical connections. However, additional accessory cables and installation materials may be necessary for completely secure and operational backup camera performance. Camera Connection: Connect the camera to the using the included DC 12V power cable. Connect the DC 12V power cable to the positive 12V reverse tail light in the rear of your vehicle. Then, connect the black wire, of the DC 12V power cable, and ground properly. This connected power and ground cable then connects to the camera, and will supply power to the camera directly. Next, use the included yellow RCA video connector cable, and run that cable from the yellow RCA video connector jack of the camera,to the yellow video connector of your compatible display monitor. The yellow RCA cable when connected, automatically retrieves the video signal when activated (when your vehicle is switched into the reverse gear). Installation Transcript: 1. Locate the reverse taillight wiring behind your vehicle's reverse light. You may need to remove an interior panel, or other cover, in order to locate the wiring. Connect the included power 12V DC power cable to the reverse light. a. Connect the power cable's Red wire to your vehicle's reverse light positive wire. b. Connect the power cable's Black wire to your vehicle's reverse light negative wire. 2. Connect the camera to this 'reverse light' connection installation, then mount the camera in the desired location. 3. Run the RCA video cable from the camera to your compatible video display monitor. * Please remember to run cables in the least obtrusive route possible. Vehicle vibrations and bumpy driving conditions ca result, so extra care should be taken to securely mount the camera and fasten all cables and wiring to secure locations. * Ensure the wires are safely and securely connected, with proper isolation applied to all connections. Additional Notes: • Determine the best location for the camera (The camera is preferably mounted just above the license plate). • Be sure when running the connection cables to leave a small amount of slack so you can still move the camera around the license plate, if you decide to slightly adjust the camera's positioning at a later time. • After installation, test the camera before use. Placing your vehicle in reverse should provide a picture in the monitor within the rearview mirror assembly. 17 www.PyleUSA.com
-
 1
1 -
2
-
3
-
4
-
5
-
6
-
7
-
8
-
9
-
10
-
11
-
12
-
 13
13 -
 14
14 -
 15
15 -
 16
16 -
 17
17 -
 18
18 -
 19
19 -
 20
20
 |
 |