RCA 25415RE3 User's Guide - Page 5
Parts Checklist, Base Layout, Telephone Jack Requirements - phones
 |
UPC - 044319400595
View all RCA 25415RE3 manuals
Add to My Manuals
Save this manual to your list of manuals |
Page 5 highlights
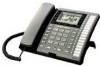
Connections & Setup Parts Checklist Make sure your package includes the following items: ATTENDANT ANSWERER MEMO DELETE PRIVACY PA GE TRANSFER REDIAL FORMAT VOLUME FLASH EXIT PLAY/STOP SELECT/SAVE REVIEW 1 2 ABC 3 DEF 4 GHI 5 JKL 6 MNO 7 PQRS 8 TUV 9 WXYZ * TONE 0 OPER # PAUSE HEADSET SPEAKER MUTE DIRECTORY 1 2 MENU 3 STORE 4 5 DIAL 6 7 INTERCOM 8 CONFER 9 LINE 4 10 11 LINE 3 12 LINE 2 13 LINE 1 14 15 HOLD 16 INTERCOM/MEMORY LOG INT. MEM. INT. MEM. INT. MEM. INT. MEM. INT. MEM. INT. MEM. INT. MEM. INT. MEM. INT. MEM. INT. MEM. INT. MEM. INT. MEM. INT. MEM. INT. MEM. INT. MEM. INT. MEM. Base Handset Handset cord Line cords AC power adaptor Telephone Jack Requirements Wall plate To use this phone, you will need an RJ11C (for a single line) or a RJ14C (for two lines) type modular phone jack, which might look like the one pictured here, installed in your home or office. If you don't have either modular jack, call your local phone company to find out how to get one installed. Modular telephone VERY IMPORTANT: In order to achieve full system operation (i.e. intercom, page, etc.), Line 1 must be connected and must line jack be common to all phones connected to the system. Only other RCA 25413 , 25414, or 25415 or GE 29487 or 29488 models are compatible for full system operation. Connecting phones other than the RCA 25413 , 25414, or 25415 or GE 29487 or 29488 to Line 1 may inhibit the intercom and paging operations. For proper operation of intercom, page function, etc., DO NOT connect a DSL modem to Line 1. To transfer a call from one station to another, the two stations should be connected to the same line. Base Layout ATTENDANT (button) ANSWERER (button) MEMO (button) headset jack EXIT (button) DELETE (button) PRIVACY (button) PAGE (button) TRANSFER (button) REDIAL/FORMAT (button) VOLUME (buttons) FLASH (button) NEW MESSAGE (indicator) SELECT/SAVE (button) REVIEW (button) PLAY/STOP (button) MEMORY 1-16 (buttons) ATTENDANT ANSWERER MEMO DELETE PRIVACY PA GE TRANSFER REDIAL FORMAT VOLUME FLASH EXIT PLAY/STOP SELECT/SAVE REVIEW 1 2 ABC 3 DEF 4 GHI 5 JKL 6 MNO 7 PQRS 8 TUV 9 WXYZ * TONE 0 OPER # PAUSE HEADSET SPEAKER MUTE DIRECTORY 1 2 MENU 3 STORE 4 5 DIAL 6 7 INTERCOM 8 CONFER 9 LINE 4 10 11 LINE 3 12 LINE 2 13 LINE 1 14 15 HOLD 16 INTERCOM/MEMORY LOG INT. MEM. INT. MEM. INT. MEM. INT. MEM. INT. MEM. INT. MEM. INT. MEM. INT. MEM. INT. MEM. INT. MEM. INT. MEM. INT. MEM. INT. MEM. INT. MEM. INT. MEM. INT. MEM. DIRECTORY (button) MENU (button) STORE (button) DIAL (button) INTERCOM (button) CONFER (button) LINE 4 (button) LINE 3 (button) LINE 2 (button) LINE 1 (button) * (button) HEADSET (button) SPEAKER (button) MUTE (button) HOLD (button) #PAUSE (button) microphone (for speakerphone) 5
-
 1
1 -
 2
2 -
 3
3 -
 4
4 -
 5
5 -
 6
6 -
 7
7 -
 8
8 -
 9
9 -
 10
10 -
 11
11 -
12
-
13
-
14
-
15
-
16
-
17
-
18
-
19
-
20
-
21
-
22
-
23
-
24
-
25
-
26
-
27
-
28
-
29
-
30
-
31
-
32
 |
 |
