RCA MGWHTR Installation Manual - Page 12
Step 5: Set Up The Sensor And Control Unit
 |
View all RCA MGWHTR manuals
Add to My Manuals
Save this manual to your list of manuals |
Page 12 highlights
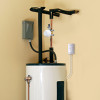
STEP 5: SET UP THE SENSOR AND CONTROL UNIT A. Connect the servo lead to the control box lead 1. Line up the round and square plugs on the control box lead to the corresponding round and square holes on the lead from the servo. 2. Snap the leads into place. 3. Use the included wire ties to gather the wires and stick them to the wall so that they're out of the way. Clean the wall first. Then stick the back of the wire tie to the wall. Use the other wire tie closer to the control box to gather the wires there as well. Note: Additional wire ties are included to help manage wires in other parts of the installation. B. Place the floor sensor on the floor near the hot water tank. Make sure the sensor is sitting flat on the floor near the hot water tank. 12
-
 1
1 -
2
-
3
-
4
-
5
-
6
-
 7
7 -
 8
8 -
 9
9 -
 10
10 -
 11
11 -
 12
12 -
 13
13 -
 14
14 -
 15
15 -
 16
16
 |
 |
