RCA RS2656 User Manual - Page 6
Settings, Display - remote control
 |
View all RCA RS2656 manuals
Add to My Manuals
Save this manual to your list of manuals |
Page 6 highlights
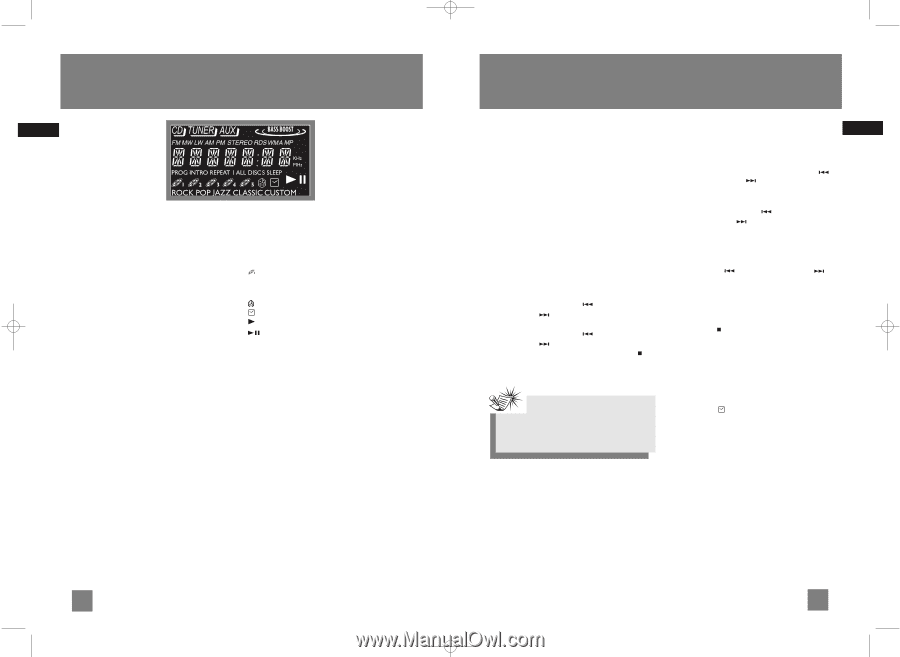
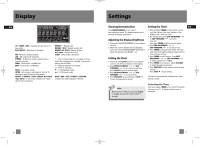
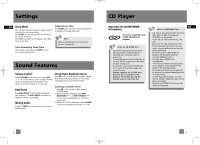
RS2656 EN.qxd 6/30/05 10:16 AM Page 12 Display EN 3 CD / TUNER / AUX - Indicates the CD, Turner or Aux mode. BASS BOOST - Bass Boost is activated. FM - FM tuner mode activated. AM - AM tuner mode activated. STEREO - In FM tuner mode, indicates stereo sound is selected. WMA - Current disc is a WMA disc. MP3 - Current disc is a MP3 disc. PROG - In program mode. INTRO - Intro mode is activated so the first 10 seconds of each CD track will be played. REPEAT 1 / REPEAT 1 DISC / REPEAT ALL DISCS / ALL DISCS - In CD mode, indicates the repeat option that is activated. REPEAT 1 - Repeat track. REPEAT 1 DISC - Repeat current disc. REPEAT ALL DISCS - Repeat all discs. ALL DISCS - Play all discs once. SLEEP - Sleep mode is activated. - The corresponding disc icon lights to show which disc compartment is loaded. The current playing disc will flash. - Random playback is activated. - Timer is activated. - In CD playback mode. - In CD pause mode. ROCK / POP / JAZZ / CLASSIC / CUSTOM Indicates the preset equalizer selected. Settings Showing Demonstration Setting the Timer EN Press DEMO/DIMMER to turn on/off demonstration mode. The demonstration scrolls through all display operations. Adjusting the Display Brightness 1. Press and hold DEMO/DIMMER for more than 2 seconds. 2. While the current dimmer level is displayed, press and release DEMO/DIMMER repeatedly to select the desired level (DIMM 1 - 3). Setting the Clock 1. Press and hold CLOCK on the unit or remote control until the hour flashes on the display. 2. Press SKIP BACKWARD or SKIP FORWARD to set the hour and then press CLOCK to shift to minute digits. 3. Press SKIP BACKWARD or SKIP FORWARD to set the minute. 4. Press PROG/SET to save settings or STOP to quit setting without saving. 1. Press and hold TIMER on the remote control until the ON and clock hour flashes on the display ( ON - timer on time ). 2. For setting time, press SKIP BACKWARD or SKIP FORWARD to set the hour and then press TIMER to shift to minute digits. 3. Press SKIP BACKWARD or SKIP FORWARD to set the minute. 4. Press TIMER to change to OF (timer off time) with clock time flashing. Repeat steps 2 & 3 for timer off time setting. 5. Press TIMER to select source. Press SKIP BACKWARD or SKIP FORWARD to select between CD / TUNER . 6. Press TIMER to set volume. Adjust VOLUME to select desired volume level. 7. Press PROG/SET on the remote control to save settings. Press STOP to quit setting. The timer is automatically activated once timer setting is saved. Note: When system is ON, you can press CLOCK to display the current time for about 4 seconds. Activating the Timer Press and release TIMER to turn on/off the alarm. The timer icon is displayed when timer is activated. 6 7
-
 1
1 -
 2
2 -
 3
3 -
 4
4 -
 5
5 -
 6
6 -
 7
7 -
 8
8 -
 9
9 -
 10
10 -
 11
11 -
 12
12 -
13
 |
 |