RCA RT2500 User Guide - Page 12
Your Remote Control - receiver recall
 |
UPC - 044319902433
View all RCA RT2500 manuals
Add to My Manuals
Save this manual to your list of manuals |
Page 12 highlights
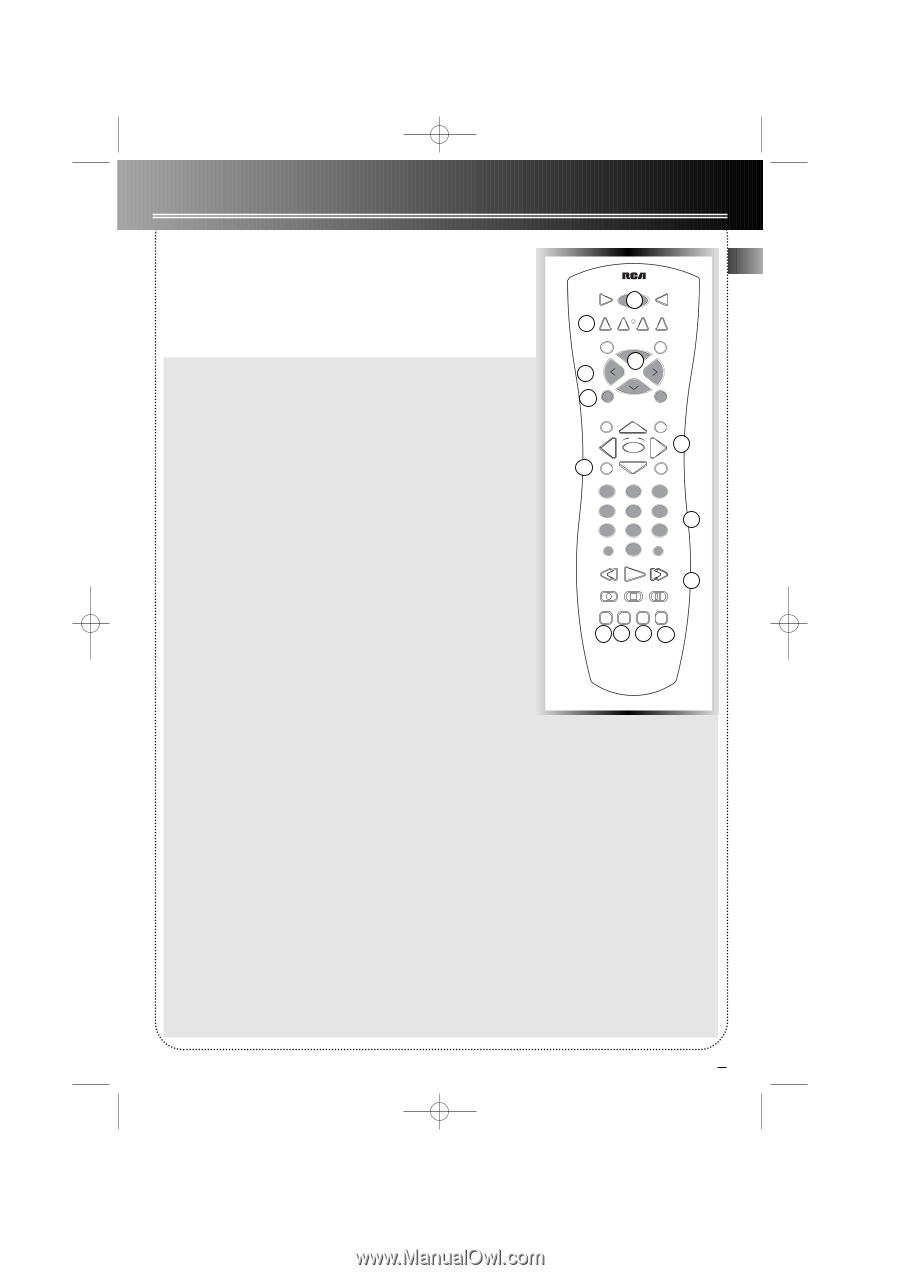
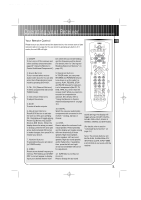
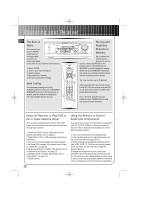
RT2500 ENG 5/26/00 2:56 PM Page 13 Operating your Receiver Your Remote Control EN Please be sure you have inserted the batteries into the remote control (see relevant section on page 3.) You can test it by pressing any button. If it works, the red LED will light. 1. ON/OFF To turn on or off the receiver and other auxillary components (see page 10 "Using the Remote to Control Additional Components"). ber while the word is still flashing and the frequency will be stored. (For details, refer to "Storing and Recalling Stations in Memory" on page 10.) VCR1 ON OFF TV 1 DVD•6 CH VCR2 AM•FM SAT•CABLE 2 CD TAPE CH + VOL 3 4 K• DISK VOL G TY 5 MUTE RDM•P CH O BAC INFO•RDS GUIDE• OK 6 2. Source Buttons To turn on and select various audio/ video sources. You can also enter the 6 Channels direct input mode by pressing DVD•6CH. 3. CH+, CH- (Channel Buttons) To select programmed stations (in TUNER mode). 4. VOL (Volume Buttons) To adjust the volume. 5. MUTE To mute all audio outputs. 6. Adjustment Buttons Press AUDIO button to activate the control, then upon pressing OK, the display will toggle among Preset EQ (Stereo only), SLEEP Mode & DIM Mode. When the display shows the setup you want to change, press the left and right arrow buttons beside OK button to make changes, then press OK to finalize your choice. 7. Number Buttons To access directly a pre-set station (in TUNER mode). 8. MENU Press to store desired frequency in memory. The flashing word MEMORY in red will appear in display. Input your desired channel num- 9. Operation Buttons In TUNER mode, you can press REVERSE and FORWARD keys to tune down or up the radio frequency. PLAY, RECORD, STOP and PAUSE keys are for easy control of components (like CD, TV, DVD, TAPE, etc.) other than the receiver itself. What you need is to encode the components in advance. (For details, refer to "Using the Remote to Control AdditionalCcomponents" on page 10.) 10. DIGITAL Select the way your audio/video components are connected to the receiver - Analog, Optical, or Coaxial. 11. LEVEL Press to adjust the volume of individual speaker. Press repeatedly and the display will toggle among different channels (Left main speaker, Right main speaker, Center speaker, Left surround speaker, Right surround speaker, and/or Subwoofer, if available), then press the left and right arrow buttons beside OK button for adjustment. 12. SURR (Surround Sound Control) Press to change the surround 8 MENU 1 2 CLEAR 3 4 5 7 8 INPUT•SEEK 0 6 7 9 ANT•FMS REVERSE PLAY FORWARD 9 RECORD STOP PAUSE AUDIO DIGITALLEVEL SURR 6 10 11 12 universal sound settings. The display will toggle among DOLBY DIGITAL, DOLBY PRO LOGIC, DOLBY 3 STEREO, STEREO and DSP modes. (For details, refer to section "Advanced Sound Control" on page 11.) Note: The remote buttons GO BACK•DISK, GUIDE•RDM•PTY, INFO•RDS, CLEAR, INPUT•SEEK & ANT•FMS do not work with the receiver. 9
-
 1
1 -
2
-
3
-
4
-
5
-
6
-
 7
7 -
 8
8 -
 9
9 -
 10
10 -
 11
11 -
 12
12 -
 13
13 -
 14
14 -
 15
15 -
 16
16 -
 17
17 -
18
-
19
-
20
-
21
-
22
-
23
 |
 |