RCA RTB1016 RTB1016 Product Manual - Page 11
Connections and Setup, Overview of Controls - Front Panel Controls - inputs
 |
View all RCA RTB1016 manuals
Add to My Manuals
Save this manual to your list of manuals |
Page 11 highlights
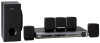
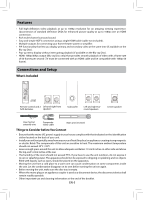
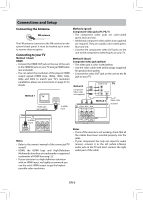
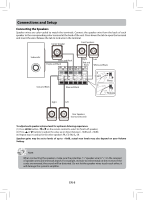
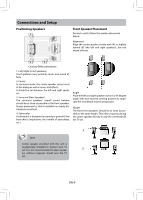
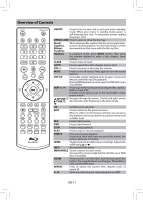
Connections and Setup Better Surround Placement Location If possible, place surround speakers to either side of the listening area, not behind it. Height If space permits, install surround speakers 2-3 feet above viewers.This helps to minimize localization effects. Aiming Aim surround speakers straight across the room, not down at viewers, to help create a more open, spacious surround sound field. No adjacent walls Surround speakers can go on stands facing each other to approximate sidewall mounting (A), or to the sides or rear of the viewing area, aimed upwards; they can go right on the floor, or preferably, a few feet off the floor such as on end tables (B). Alternative Surround Placement Rear wall If rear wall mounting is the only choice, aim the speakers at each other (A), towards the front (B) or towards the sidewalls (C, D). Experiment with placement until sounds seem to surround you, rather than come from behind you. Test Tone/Channel Balance Channel Balance Your receiver is equipped with a test signal generator to help balance the audio level for each channel (see Page 8 for details). Level Adjustment and Surround Channel Level Expectation Even though you adjust the surround channel to be as loud as the others on the test signal, you may find that surround channels seems quieter for actual TV and Movie content. This is because producers use surround for subtle atmospherics and ambience, and only rarely for special effects. Overview of Controls - Front Panel Controls Press to open or close the disc tray. Switch the unit Adjust the on and off. volume. Start/pause playback. Select the input sources. Press repeatedly to select: BD/USB, OPTICAL, AUX, TUNER. Connect a USB flash drive to this port. EN-10
-
 1
1 -
2
-
3
-
4
-
5
-
 6
6 -
 7
7 -
 8
8 -
 9
9 -
 10
10 -
 11
11 -
 12
12 -
 13
13 -
 14
14 -
 15
15 -
 16
16 -
17
-
18
-
19
-
20
-
21
-
22
-
23
-
24
-
25
-
26
-
27
-
28
-
29
-
30
-
31
-
32
 |
 |