RCA SPS36123 SPS36123 Product Manual - Page 11
Mounting Instructions - measurements
 |
View all RCA SPS36123 manuals
Add to My Manuals
Save this manual to your list of manuals |
Page 11 highlights
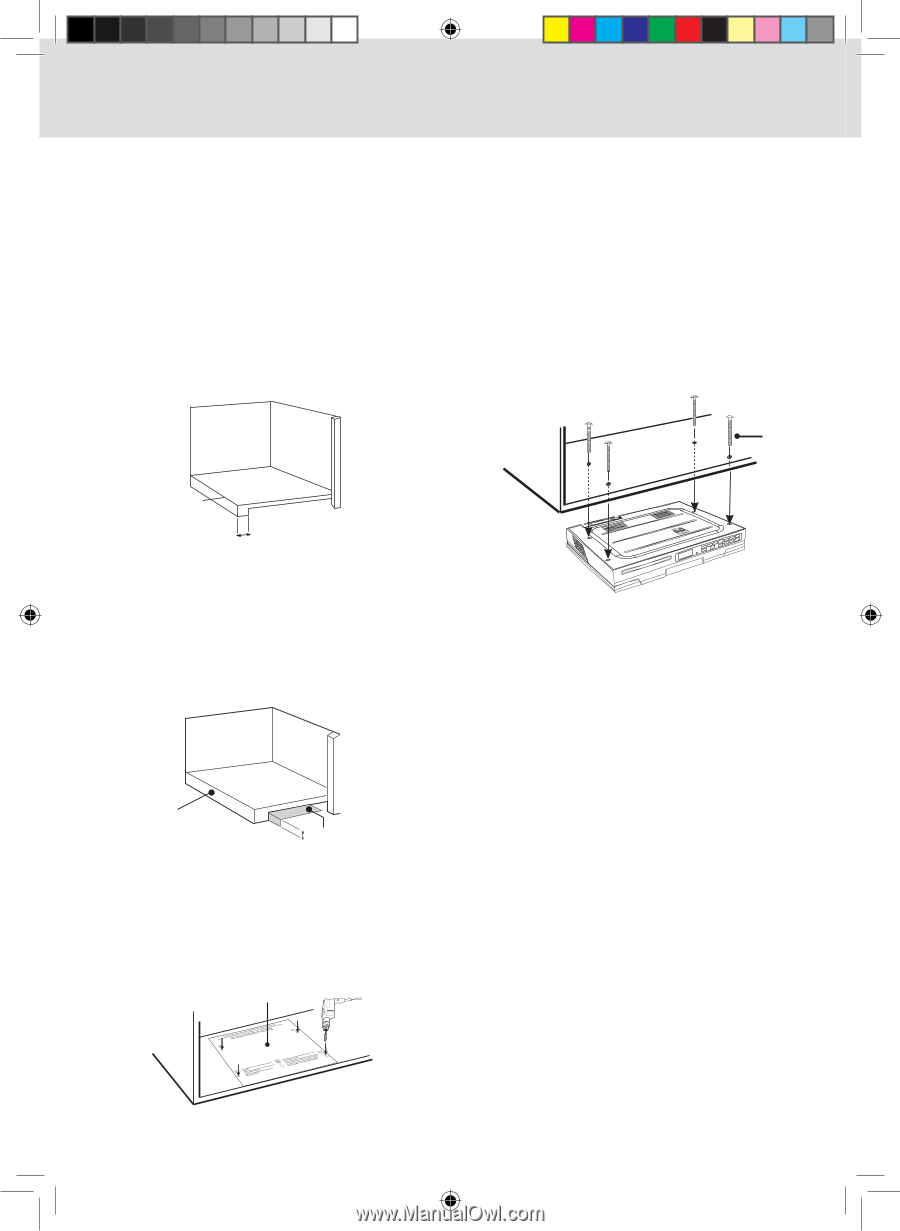
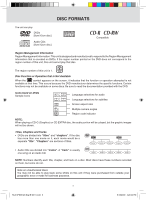
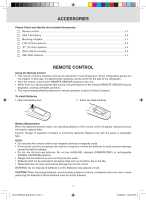
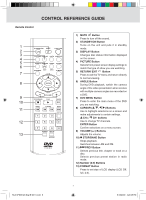
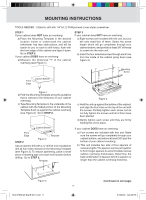
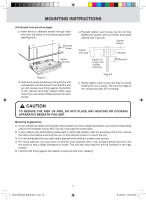
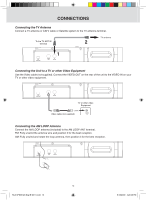
mounting instructions TOOLS NEEDED: 1) Electric drill with 1/4" bit; 2) Phillips-head (cross style) screwdriver. STEP 1 If your cabinet does NOT have an overhang: a) Place the Mounting Template in the desired location inside or underneath the cabinet (whichever has less obstructions, and will be easier for you to reach to drill holes), flush with the front edge of the cabinet and tape it down. Go to STEP 2. If your cabinet DOES have an overhang: a) Measure the thickness "T" of the cabinet overhang (see Figure 1). STEP 3 If your cabinet does NOT have an overhang: a) Eight screws are included with this unit, but you will only need four of them. Select the screw length which will go completely through your cabinet bottom, and provide at least 3/8" of thread to screw into the main unit. b) Insert the four selected screws through each hole from the inside of the cabinet going down (see Figure 4). Mounting Screw Front Edge Cabinet Bottom T Figure 1 b) Fold the Mounting Template along the guideline that is closest to the thickness of your cabinet overhang. c) Tape Mounting Template to the underside of the cabinet with the folded portion of the Mounting Template flush up against the cabinet overhang (see Figure 2). Go to STEP 2. Figure 4 c) Hold the unit up against the bottom of the cabinet, and align the four holes on the top of the unit with the screws. Partially tighten each screw, but do not fully tighten the screws until all of them have been started. d) Gently tighten each screw until they are firmly holding the unit in place. Cabinet Bottom Front Edge Template Figure 2 STEP 2 Use an electric drill with a ¼" drill bit (not included) to drill all four holes marked on the Mounting Template (see Figure 3). To reduce splintering, place a small piece of masking tape over each hole location before drilling. Go to STEP 3. Template If your cabinet DOES have an overhang: a) Four screws are included with this unit. Make sure the screws will go completely through your cabinet bottom, and extend at least 3/8" past the bottom of your cabinet overhang. b) This unit includes two sets of four spacers of various lengths. The spacers can be put together to form longer spacers to accommodate various cabinet overhang thicknesses. Determine the best combination of spacers which is equal to or longer than the cabinet overhang thickness. Figure 3 10 RCA SPS36123 Eng IB W011.indd 11 (Continued on next page) 8/18/2009 4:29:48 PM
-
 1
1 -
2
-
3
-
4
-
5
-
 6
6 -
 7
7 -
 8
8 -
 9
9 -
 10
10 -
 11
11 -
 12
12 -
 13
13 -
 14
14 -
 15
15 -
 16
16 -
17
-
18
-
19
-
20
-
21
-
22
-
23
-
24
-
25
-
26
-
27
-
28
-
29
-
30
-
31
-
32
 |
 |