Reebok Rt1000 Treadmill Uk Manual - Page 6
Assembly
 |
View all Reebok Rt1000 Treadmill manuals
Add to My Manuals
Save this manual to your list of manuals |
Page 6 highlights
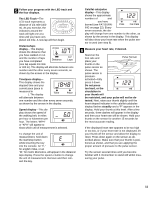
ASSEMBLY Assembly requires two people. Set the treadmill in a cleared area and remove all packing materials. Do not dispose of the packing materials until assembly is completed. Assembly requires the included allen wrench and your own phillips screwdriver . 1. With the help of a second person, carefully raise the 1 treadmill to the upright position. Whilst a second person tips the treadmill to one side and holds it, insert one of the Extension Legs (103) into the treadmill as shown. Make sure that the Extension Leg is turned so the Caution Decal (not shown) is on top. Next, tip the treadmill to the other side and attach the other Extension Leg in the same way. With the help of a second person, lower the treadmill so that both Extension Legs (103) are resting on the floor. 103 2. Remove the Lock Knob (80) from the Lock Pin (73). Make sure that the Lock Pin Collar (119) and the Spring (56) are on the Lock Pin (73). Insert the Lock Pin into the Lock Knob Sleeve (118) on the left Upright (82). Tighten the Lock Knob (80) onto the Lock Pin. 2 80 118 82 56 119 73 3. Insert one of the Handrails (74) fully into the tube at the top of the right Upright (82). To make insertion easier, 3 pivot the Handrail back and forth, as shown, as you in- sert it into the tube. Next, align the lower end of the Handrail with the corre- 82 82 sponding hole in the base of the right Upright (82). Be 74 careful not to scratch the paint. 74 Insert the other Handrail (74) into the tube on the left Upright (82) in the same way. 6
-
 1
1 -
 2
2 -
 3
3 -
 4
4 -
 5
5 -
 6
6 -
 7
7 -
 8
8 -
 9
9 -
 10
10 -
 11
11 -
 12
12 -
13
-
14
-
15
-
16
-
17
-
18
-
19
-
20
-
21
-
22
-
23
-
24
-
25
-
26
 |
 |
