Reebok Rt1000 Treadmill Uk Manual - Page 7
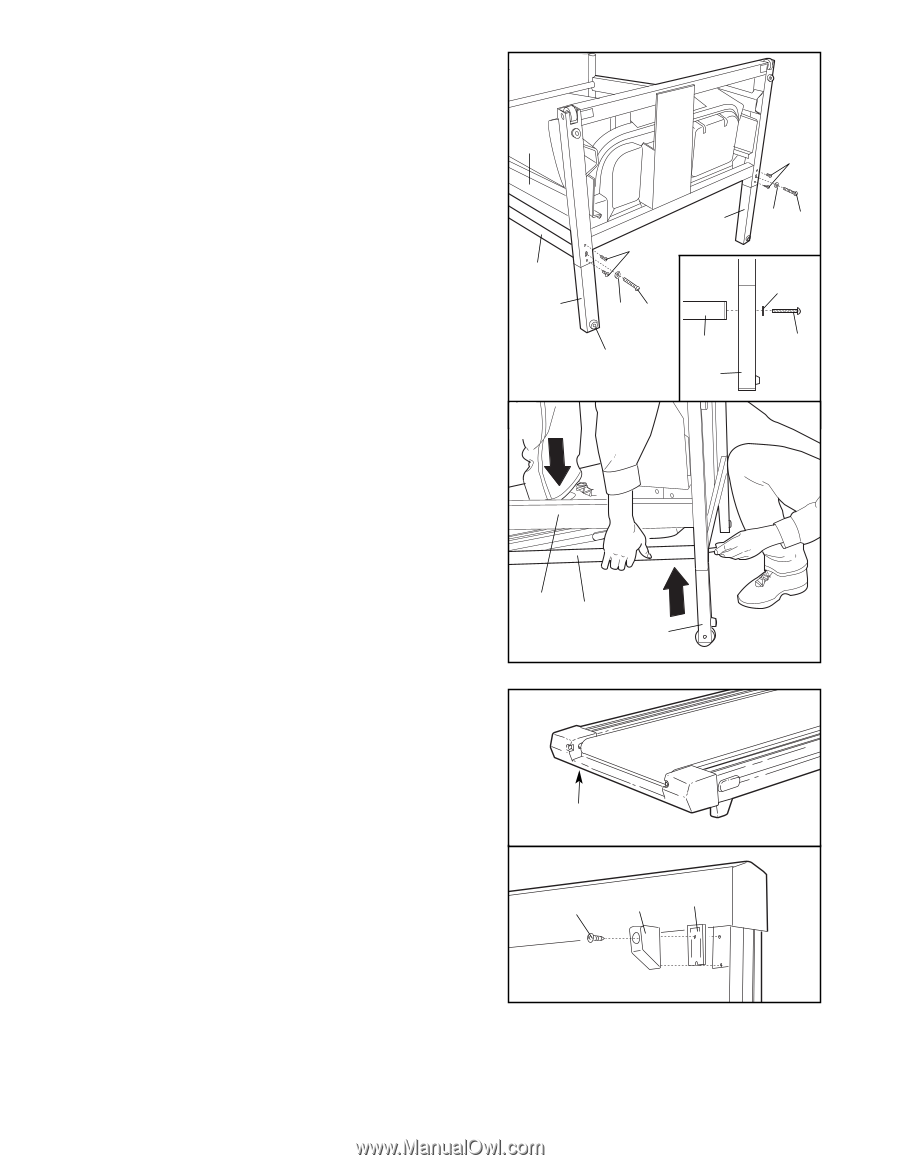
Bolts into the Handrails 74. The Handrail Bolts should
 |
View all Reebok Rt1000 Treadmill manuals
Add to My Manuals
Save this manual to your list of manuals |
Page 7 highlights
4. With the help of a second person, tip the Uprights (82) down as shown. Make sure that the Extension Legs (103) and the Handrails (74) remain in the Uprights. Insert a Handrail Bolt (78) with a Handrail Washer (48) into each Extension Leg (103) and tighten the Handrail Bolts into the Handrails (74). The Handrail Bolts should be inserted at right angles to the base of the Uprights (see drawing 4b). If it is difficult to align the hole in a Handrail (74) with the hole in one of the Uprights (82), move the Handrail up or down, or have a second person stand on the treadmill and lift the Handrail as shown in drawing 4c. Refer to drawing 4. Attach each Extension Leg (103) with two Screws (76), as shown. Note: One replacement Base Pad (97) may be included. Use the extra Base Pad if one becomes worn or needs to be replaced. With the help of a second person, carefully raise the treadmill back to the upright position. 4 82 74 103 4c 103 76 4b 48 78 74 97 103 76 48 78 48 78 82 74 103 5. Refer to drawing 5. Locate the left Rear Foot (59) on the 5 treadmill. If the left rear foot touches the floor, go to step 6. If there is space between the left Rear Foot and the floor, follow the instructions below. Hold the treadmill firmly with both hands, and raise the treadmill to the storage position (see page 18). 59 Using a phillips screwdriver, remove the Rear Foot Screw (60), the right Rear Foot (59) and the Rear Foot 5b Spacer (8). Reattach the right Rear Foot without the Rear Foot Spacer. Hold the treadmill with both hands and lower the treadmill (see page 18). Re-check the left 60 59 8 Rear Foot (59). If the left Rear Foot is still off the floor, raise the treadmill and remove the left Rear Foot. Snap the Rear Foot Spacer (8) onto the left Rear Foot and reattach the left Rear Foot. Carefully lower the treadmill. 6. Make sure that all parts are tightened before you use the treadmill. To protect the floor or carpet, place a mat under the treadmill. 7
-
 1
1 -
 2
2 -
 3
3 -
 4
4 -
 5
5 -
 6
6 -
 7
7 -
 8
8 -
 9
9 -
 10
10 -
 11
11 -
 12
12 -
13
-
14
-
15
-
16
-
17
-
18
-
19
-
20
-
21
-
22
-
23
-
24
-
25
-
26
 |
 |