Reebok Trainer Rx 3.0 Cwl Bike English Manual - Page 6
Assembly
 |
View all Reebok Trainer Rx 3.0 Cwl Bike manuals
Add to My Manuals
Save this manual to your list of manuals |
Page 6 highlights
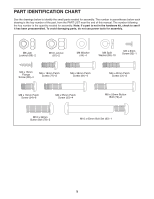
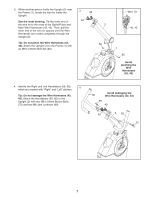
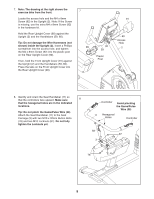
ASSEMBLY • To hire an authorized service technician to assemble the exercise bike, call 1-800-445-2480. • Assembly requires two persons. • Place all parts in a cleared area and remove the packing materials. Do not dispose of the packing materials until you complete all assembly steps. • To identify small parts, see page 5. • In addition to the included tool(s), assembly requires the following tools: one adjustable wrench one Phillips screwdriver one rubber mallet Assembly may be easier if you have a socket set or a set of ratchet wrenches. To avoid damaging parts, do not use power tools. 1. Orient the Right Front Stabilizer (40) as shown. 1 Attach the Right Front Stabilizer (40) to the right side of the Frame (1) with three M8 x 16mm Patch Screws (54) and three M8 Split Washers (55). Attach the Left Front Stabilizer (not shown) in the same way. 1 40 2. While another person lifts the rear of the Frame (1), attach the Rear Stabilizer (16) to the Frame 2 with four M8 x 55mm Patch Screws (52) and four M8 Split Washers (55). 6 55 55 54 54 1 16 55 55 52
-
 1
1 -
 2
2 -
 3
3 -
 4
4 -
 5
5 -
 6
6 -
 7
7 -
 8
8 -
 9
9 -
 10
10 -
 11
11 -
 12
12 -
13
-
14
-
15
-
16
-
17
-
18
-
19
-
20
-
21
-
22
-
23
-
24
-
25
-
26
-
27
-
28
 |
 |
