Reebok Trainer Rx 3.0 Cwl Bike English Manual - Page 9
Tip: Do not pinch the Game/Pulse Wire 58
 |
View all Reebok Trainer Rx 3.0 Cwl Bike manuals
Add to My Manuals
Save this manual to your list of manuals |
Page 9 highlights
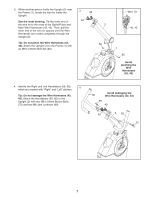
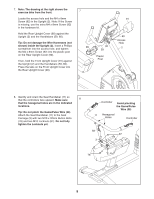
7. Note: The drawing at the right shows the exercise bike from the front. Locate the access hole and the M4 x 8mm Screw (92) in the Upright (2). Note: If the Screw is missing, use the extra M4 x 8mm Screw (92) in the hardware kit. Hold the Rear Upright Cover (90) against the Upright (2) and the Handlebars (59, 60). Tip: Do not damage the Wire Harnesses (not shown) inside the Upright (2). Insert a Phillips screwdriver into the access hole, and tighten the M4 x 8mm Screw (92) into the plastic post on the Rear Upright Cover (90). Then, hold the Front Upright Cover (91) against the Upright (2) and the Handlebars (59, 60). Press the tabs on the Front Upright Cover into the Rear Upright Cover (90). 7 90 92 59 Plastic Post 91 60 Access Hole 2 8. Identify and orient the Seat Handlebar (11) so that the controllers face upward. Make sure 8 that the hexagonal holes are in the indicated locations. Tip: Do not pinch the Game/Pulse Wire (58). Attach the Seat Handlebar (11) to the Seat Carriage (3) with two M10 x 32mm Button Bolts (78) and two M10 Locknuts (87). Do not fully tighten the Locknuts yet. Controller Avoid pinching the Game/Pulse Wire (58) 11 Hexagonal Holes Controller 58 87 3 78 9
-
 1
1 -
2
-
3
-
 4
4 -
 5
5 -
 6
6 -
 7
7 -
 8
8 -
 9
9 -
 10
10 -
 11
11 -
 12
12 -
 13
13 -
 14
14 -
15
-
16
-
17
-
18
-
19
-
20
-
21
-
22
-
23
-
24
-
25
-
26
-
27
-
28
 |
 |
