Ricoh FAX4430L Facsimile Reference [Basic Features] - Page 26
Guide to Components
 |
UPC - 026649305344
View all Ricoh FAX4430L manuals
Add to My Manuals
Save this manual to your list of manuals |
Page 26 highlights
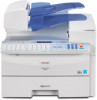
Getting Started Guide to Components 1 Front View The following illustration is for Type1. 1. ADF cover Cover for the ADF. 2. Release button Push this button to open the ADF. 3. Auto Document Feeder (ADF) Set multi-page originals here to have them automatically scanned in one page at a time. 4. Output tray Received fax messages and copies are stacked here. 5. Control panel Operate the machine using keys and watching the display on the control panel. 6. Front cover Open this cover when changing the toner cartridge and the photo conductor unit inside the machine. 20 AZX004 7. Main paper tray Load paper here. 8. Optional paper tray unit (Option) You can load more paper here. 9. Lower right cover Open this cover to remove jammed paper fed from the optional paper tray unit. 10. Bypass tray unit (Option for Type1) A received fax message will be printed on paper in this tray if there is no paper loaded in the paper trays. A received message also will be printed on paper in this tray if the size of that paper is more suitable for the message than the size of paper in the paper trays. When making copies on custom size paper, thick paper, or special paper, use this tray.
-
 1
1 -
2
-
3
-
4
-
5
-
6
-
7
-
8
-
9
-
10
-
11
-
12
-
13
-
14
-
15
-
16
-
17
-
18
-
19
-
20
-
 21
21 -
 22
22 -
 23
23 -
 24
24 -
 25
25 -
 26
26 -
 27
27 -
 28
28 -
 29
29 -
 30
30 -
 31
31 -
32
-
33
-
34
-
35
-
36
-
37
-
38
-
39
-
40
-
41
-
42
-
43
-
44
-
45
-
46
-
47
-
48
-
49
-
50
-
51
-
52
-
53
-
54
-
55
-
56
-
57
-
58
-
59
-
60
-
61
-
62
-
63
-
64
-
65
-
66
-
67
-
68
-
69
-
70
-
71
-
72
-
73
-
74
-
75
-
76
-
77
-
78
-
79
-
80
-
81
-
82
-
83
-
84
-
85
-
86
-
87
-
88
-
89
-
90
-
91
-
92
-
93
-
94
-
95
-
96
-
97
-
98
-
99
-
100
-
101
-
102
-
103
-
104
-
105
-
106
-
107
-
108
-
109
-
110
-
111
-
112
-
113
-
114
-
115
-
116
-
117
-
118
 |
 |
