Ricoh FAX4430L Facsimile Reference [Basic Features] - Page 30
Add Toner indicator, Load Paper indicator, Receive File indicator, Quick Dial keys, Quick Dial Key - user manual
 |
UPC - 026649305344
View all Ricoh FAX4430L manuals
Add to My Manuals
Save this manual to your list of manuals |
Page 30 highlights
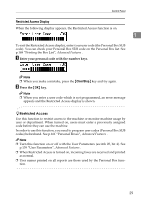
Getting Started 1 24 10. Add Toner indicator Blinks when toner is low and lights continuously when toner has completely run out. See p.92 "Replacing the Toner Cartridge". 11. Load Paper indicator Lights when a paper tray is empty or the paper tray is not fully inserted. 12. Receive File indicator Lights when a message has been received into memory. 13. {Energy Saver/Clear Modes} key • Energy Saver: Hold down this key for about 2 seconds to manually enter Energy Saver mode. The machine automatically enters Energy Saver mode about 5 minutes after the last operation is carried out. See p.203 "Energy Saving", Advanced Features . • Clear Modes: Cancel the current settings and return to the standby mode (except when accessing the User Tools). 14. {Copy} key Press to copy the originals currently loaded in the ADF. 15. Quick Dial keys Use to dial numbers with a single touch or to enter letters and symbols. Also use for the Group Dial function. You can select from two types of keyboard layout: QWERTY (as shown in the illustration) and ABCDEF. See p.155 "Key Layout", Advanced Features . 16. Quick Dial Key Flip Plate There are two Quick Dial Key Flip Plates. • To access Quick Dials {01} to {30}, flip both plates right. • To access Quick Dials {31} to {60}, flip one plate left. • To access Quick Dials {61} to {90}, flip both plates left. Note ❒ Make sure the plate is flat against the control panel when you use Quick Dial keys. 17. {Stamp} key Press this key to switch the Stamp function on. See p.53 "Stamp", Advanced Features . 18. Original Type key • Color Scan (Only for Type2, and Type1 with the optional NIC FAX unit) Select when scanning color originals using the optional scanner function. • Halftone Select halftone when faxing or copying photographs or illustrations with fine gradations. Also it can be used for color originals. 19. {Memory Trans.} key Press this key to switch between Memory Transmission and Immediate Transmission modes. When the indicator is not lit, Immediate Transmission is selected, and when the indicator is lit, Memory Transmission is selected. 20. Resolution key Press to select the level of detail (Standard, Detail, Super Fine, Extra Super Fine or 300 dpi) to be sent. 300 dpi can be selected only with the scanner function of Type2 and Type1 with the optional NIC FAX unit. ZHMS190E Note ❒ When receiving fax messages or copy- ing with Extra Super Fine, the optional 40MB memory card is required. ❒ To select 300 dpi, the NIC FAX unit (Option for Type1) is required.
-
 1
1 -
2
-
3
-
4
-
5
-
6
-
7
-
8
-
9
-
10
-
11
-
12
-
13
-
14
-
15
-
16
-
17
-
18
-
19
-
20
-
21
-
22
-
23
-
24
-
 25
25 -
 26
26 -
 27
27 -
 28
28 -
 29
29 -
 30
30 -
 31
31 -
 32
32 -
 33
33 -
 34
34 -
 35
35 -
36
-
37
-
38
-
39
-
40
-
41
-
42
-
43
-
44
-
45
-
46
-
47
-
48
-
49
-
50
-
51
-
52
-
53
-
54
-
55
-
56
-
57
-
58
-
59
-
60
-
61
-
62
-
63
-
64
-
65
-
66
-
67
-
68
-
69
-
70
-
71
-
72
-
73
-
74
-
75
-
76
-
77
-
78
-
79
-
80
-
81
-
82
-
83
-
84
-
85
-
86
-
87
-
88
-
89
-
90
-
91
-
92
-
93
-
94
-
95
-
96
-
97
-
98
-
99
-
100
-
101
-
102
-
103
-
104
-
105
-
106
-
107
-
108
-
109
-
110
-
111
-
112
-
113
-
114
-
115
-
116
-
117
-
118
 |
 |
