Ridgid RV2400A Owners Manual - Page 10
Drum/Caddy Assembly cont.
 |
View all Ridgid RV2400A manuals
Add to My Manuals
Save this manual to your list of manuals |
Page 10 highlights
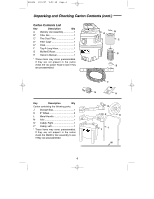
SP6636 1/10/07 9:52 AM Page 10 Drum/Caddy Assembly (cont.) 8. Insert the caster stem into the socket of the caster foot as shown. (Front casters only). 9. Push on the caster until the ball on the caster stem is inserted all the way into the socket. You will be able to hear the ball snap into the socket and the caster will swivel easily when positioning is correct. 10. Install (4) #10 x 1-3/4" screws into matching holes on both right and left side of caddy, securing the caddies to the bottom of the drum. Tighten screws until just snug. Do not over tighten the screws, as this may deform the caddies. Caster (2) Socket Caster Stem Caster Ball #10 x 1-3/4" Screw (4) Installing Handle Press and hold release buttons while installing handle into handle receptacles in drum (See illustration). NOTE: An audible snap of release buttons indicates successful engagement of handle. Removing Handle Press and hold release buttons as shown. While firmly pushing in release buttons, pull handle upwards to remove (see illustration). 10
-
 1
1 -
2
-
3
-
4
-
 5
5 -
 6
6 -
 7
7 -
 8
8 -
 9
9 -
 10
10 -
 11
11 -
 12
12 -
 13
13 -
 14
14 -
 15
15 -
16
-
17
-
18
-
19
-
20
-
21
-
22
-
23
-
24
-
25
-
26
-
27
-
28
-
29
-
30
-
31
-
32
-
33
-
34
-
35
-
36
-
37
-
38
-
39
-
40
-
41
-
42
-
43
-
44
-
45
-
46
-
47
-
48
-
49
-
50
-
51
-
52
-
53
-
54
-
55
-
56
-
57
-
58
-
59
-
60
-
61
-
62
-
63
-
64
-
65
-
66
-
67
-
68
 |
 |
