Ridgid RV2400A Owners Manual - Page 8
Replacement Filter Assembly
 |
View all Ridgid RV2400A manuals
Add to My Manuals
Save this manual to your list of manuals |
Page 8 highlights
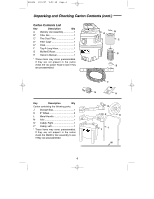
SP6636 1/10/07 9:52 AM Page 8 Replacement Filter Assembly 1. Carefully slide the filter over the filter cage, sliding it over the center ring covering the 3 slots until the filter stops against the lid. 2. Place filter nut onto threaded stud and tighten it down. Finger tighten only. NOTE: Lever of filter nut should be away from plate as shown. IMPORTANT: Do not overtighten as this may deform or crack the filter cage, or filter. Filter Nut Lever Lid Filter Nut Filter Plate Filter Threaded Stud Filter Cage Slots (3) Filter Cage Assembly NOTE: If filter cage needs to be removed, because the float is placed in the wrong way, use a flat blade screwdriver and insert the blade near one of the tabs between the filter cage and the center ring of the lid. Pry the tab out of the slot. Tilt the cage and lift away from the lid. To replace, follow the assembly instructions below: WARNING: For your own safety, never connect plug to power source outlet until all assembly steps are complete and you have read and understood the safety and operation instructions. Do not operate vac with any parts damaged or missing. 1. Place the float over the opening in the center of the lid with the words "This Side Towards Lid" laying face down over the hole. WARNING: To avoid personal injury or damage to vac, be sure to keep hands, fingers, or any other foreign objects out of the center opening when assembling the float . 2. Line up filter cage tabs with slots in the center ring of the lid. 3. Push on the filter cage until the tabs snap into slots for a secure fit. Filter Cage Tabs (3) Float Solid End THIS SIDE TOWARD LID Power Head Assembly Lid Filter Cage Tabs (3) Slots (3) Slots (3) 8
-
 1
1 -
2
-
 3
3 -
 4
4 -
 5
5 -
 6
6 -
 7
7 -
 8
8 -
 9
9 -
 10
10 -
 11
11 -
 12
12 -
 13
13 -
14
-
15
-
16
-
17
-
18
-
19
-
20
-
21
-
22
-
23
-
24
-
25
-
26
-
27
-
28
-
29
-
30
-
31
-
32
-
33
-
34
-
35
-
36
-
37
-
38
-
39
-
40
-
41
-
42
-
43
-
44
-
45
-
46
-
47
-
48
-
49
-
50
-
51
-
52
-
53
-
54
-
55
-
56
-
57
-
58
-
59
-
60
-
61
-
62
-
63
-
64
-
65
-
66
-
67
-
68
 |
 |
