Ryobi P610 English Manual - Page 14
Chamfering, Planing Edges And Making Rabbet Cuts, Attaching The Edge Guide For Planing, Edges
 |
View all Ryobi P610 manuals
Add to My Manuals
Save this manual to your list of manuals |
Page 14 highlights
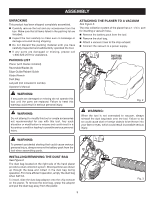
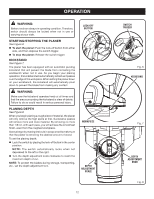
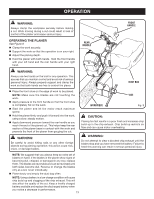
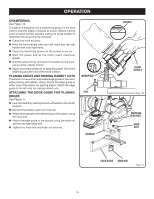
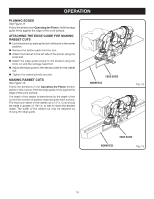
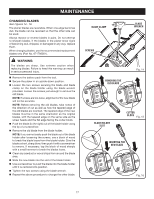
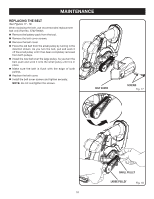
OPERATION CHAMFERING See Figure 10. The planer is designed with a chamfering groove in the front shoe to chamfer edges of boards as shown. Before making a cut on good lumber, practice cutting on scrap lumber to determine the amount to be removed. Clamp the work securely. Hold the front handle with your left hand and the rear handle with your right hand. Place the chamfering groove on the surface to be cut. Start the planer and let the motor reach maximum speed. Hold the planer firmly and push it forward into the work, using a slow, steady motion. Apply downward pressure to keep the planer flat at the beginning and the end of the work surface. PLANING EDGES AND MAKING RABBET CUTS The planer comes with an adjustable edge guide for precision edge planing and rabbet cutting. Attach the edge guide to either side of the planer for planing edges. Attach the edge guide to the left side for making rabbet cuts. ATTACHING THE EDGE GUIDE FOR PLANING EDGES See Figure 11. Lock the switch by placing the lock-off button in the center position. Remove the battery pack from the tool. Attach the bracket to the desired side of the planer using the knob bolt. Attach the edge guide to the bracket using the knob nut and the carriage head bolt. Tighten the knob bolt and knob nut securely. WORKPIECE VISE BRACKET GROOVE FRONT HANDLE Fig. 10 CARRIAGE HEAD BOLT KNOB BOLT EDGE GUIDE KNOB NUT Fig. 11 14
-
 1
1 -
2
-
3
-
4
-
5
-
6
-
7
-
8
-
 9
9 -
 10
10 -
 11
11 -
 12
12 -
 13
13 -
 14
14 -
 15
15 -
 16
16 -
 17
17 -
 18
18 -
 19
19 -
20
 |
 |
