Ryobi RY120350 Operation Manual - Page 11
Selecting The Right Nozzle For The, Nozzle Selection Guide, Rinsing With The Power Cleaner, Starting
 |
View all Ryobi RY120350 manuals
Add to My Manuals
Save this manual to your list of manuals |
Page 11 highlights
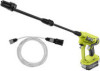
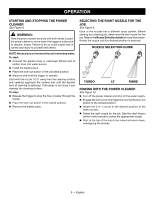
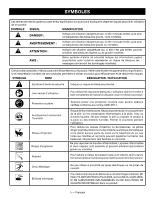
OPERATION STARTING AND STOPPING THE POWER CLEANER See Figure 8. WARNING: Hold the power cleaner securely with both hands. Expect the power cleaner to move when the trigger is pulled due to reaction forces. Failure to do so could cause loss of control and injury to yourself and others. NOTE: Never place or immerse the unit in standing water. To start: n Connect the garden hose or submerge filtered end of siphon hose into water source. n Install the battery pack. n Place the lock-out button in the unlocked position. n Squeeze and hold the trigger to operate. Start with the nozzle 1-2 ft. away from the cleaning surface and carefully approach the surface just until the desired level of cleaning is achieved. If the spray is too close it can damage the cleaning surface. To stop: n Release the trigger to stop the flow of water through the nozzle. n Place the lock-out button in the locked position. n Remove the battery pack. SELECTING THE RIGHT NOZZLE FOR THE JOB See Figure 9. Each of the nozzles has a different spray pattern. Before starting any cleaning job, determine the best nozzle for the job. Refer to the Nozzle Selection Guide for more information. Rotate the nozzle until the desired position is selected. NOZZLE SELECTION GUIDE TURBO 15˚ RINSE RINSING WITH THE POWER CLEANER See Figure 10. n Turn off the power cleaner and shut off the water supply. n Engage the lock out on the trigger by moving the lock-out button to the locked position. n Rotate the 3-in-1 nozzle to the desired position of the three nozzles. n Select the right nozzle for the job. See the chart shown earlier in the manual to select the appropriate nozzle. n Start at the top of the area to be rinsed and work down, overlapping the strokes. 9 - English
-
 1
1 -
2
-
3
-
4
-
5
-
 6
6 -
 7
7 -
 8
8 -
 9
9 -
 10
10 -
 11
11 -
 12
12 -
 13
13 -
 14
14 -
 15
15 -
 16
16 -
17
-
18
-
19
-
20
-
21
-
22
-
23
-
24
-
25
-
26
-
27
-
28
-
29
-
30
-
31
-
32
-
33
-
34
 |
 |