Samsung DV150F User Manual Ver.1.0 (English) - Page 100
Transferring files to the computer, Transferring files to your Windows OS computer
 |
View all Samsung DV150F manuals
Add to My Manuals
Save this manual to your list of manuals |
Page 100 highlights
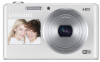
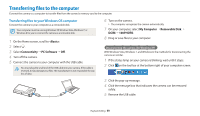
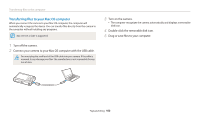
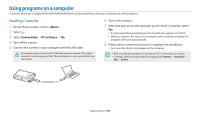
Transferring files to the computer Connect the camera to a computer to transfer files from the camera's memory card to the computer. Transferring files to your Windows OS computer Connect the camera to your computer as a removable disk. Your computer must be running Windows XP, Windows Vista, Windows 7, or Windows 8 for you to connect the camera as a removable disk. 1 On the Home screen, scroll to . 2 Select . 3 Select Connectivity “ PC Software “ Off. 4 Turn off the camera. 5 Connect the camera to your computer with the USB cable. You must plug the small end of the USB cable into your camera. If the cable is reversed, it may damage your files. The manufacturer is not responsible for any loss of data. 6 Turn on the camera. • The computer recognizes the camera automatically. 7 On your computer, select My Computer “ Removable Disk “ DCIM “ 100PHOTO. 8 Drag or save files to your computer. Disconnecting the camera (for Windows XP) With Windows Vista, Windows 7, and Windows 8, the methods for disconnecting the camera are similar. 1 If the status lamp on your camera is blinking, wait until it stops. 2 Click on the tool bar at the bottom right of your computer screen. 3 Click the pop-up message. 4 Click the message box that indicates the camera can be removed safely. 5 Remove the USB cable. Playback/Editing 99
-
 1
1 -
2
-
3
-
4
-
5
-
6
-
7
-
8
-
9
-
10
-
11
-
12
-
13
-
14
-
15
-
16
-
17
-
18
-
19
-
20
-
21
-
22
-
23
-
24
-
25
-
26
-
27
-
28
-
29
-
30
-
31
-
32
-
33
-
34
-
35
-
36
-
37
-
38
-
39
-
40
-
41
-
42
-
43
-
44
-
45
-
46
-
47
-
48
-
49
-
50
-
51
-
52
-
53
-
54
-
55
-
56
-
57
-
58
-
59
-
60
-
61
-
62
-
63
-
64
-
65
-
66
-
67
-
68
-
69
-
70
-
71
-
72
-
73
-
74
-
75
-
76
-
77
-
78
-
79
-
80
-
81
-
82
-
83
-
84
-
85
-
86
-
87
-
88
-
89
-
90
-
91
-
92
-
93
-
94
-
 95
95 -
 96
96 -
 97
97 -
 98
98 -
 99
99 -
 100
100 -
 101
101 -
 102
102 -
 103
103 -
 104
104 -
 105
105 -
106
-
107
-
108
-
109
-
110
-
111
-
112
-
113
-
114
-
115
-
116
-
117
-
118
-
119
-
120
-
121
-
122
-
123
-
124
-
125
-
126
-
127
-
128
-
129
-
130
-
131
-
132
-
133
-
134
-
135
-
136
-
137
-
138
-
139
-
140
-
141
-
142
-
143
-
144
-
145
-
146
-
147
-
148
-
149
-
150
-
151
-
152
-
153
-
154
-
155
-
156
-
157
-
158
-
159
-
160
-
161
-
162
 |
 |