Samsung DVD 1080P7 User Manual (ENGLISH) - Page 15
Connecting to a TV (Interlace) - remote control
 |
UPC - 036725607743
View all Samsung DVD 1080P7 manuals
Add to My Manuals
Save this manual to your list of manuals |
Page 15 highlights
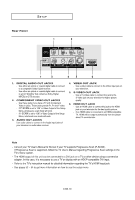
Connections CONNECTIONS Connecting to a TV (Interlace) - Connecting to your TV using Component video cables. The 480i resolution is possible with this connection. - This is the best available connection if your TV is not capable of receiving a Progressive Scan signal. - You will enjoy excelllent quality and accurate color reproduction images. Component video separates the picture element into black and white(Y), blue(PB), red(PR) signals to present clear and clean images. (Audio signals are delivered through the audio output.) 1 Using Component video cables (not included), connect the COMPONENT VIDEO OUT jacks on the rear of the DVD player to the COMPONENT IN jackls of your TV. 2 Using the audio cables, connect the AUDIO (red and white) OUT jackls on the rear of the DVD player to the AUDIO (red and white) IN jackls of your TV. Turn on your DVD player and TV. 3 Set the Video Output to I-SCAN in the Display Setup menu. (See pages 52 to 54) You can also use the VIDEO SEL. button to change the Video Output mode. (See page 12) RED BLUE GREEN RED WHITE Audio Cable (Included) RED WHITE RED BLUE GREEN Component cable (not included) 4 Press the input selector on your TV remote control until the Component signal from the DVD player appears on the TV screen. Note - If the Video output is incorrectly set to S-Video with the Component cables connected, the screen will turn black automatically about 10 seconds later. - If you want to connect to an Amplifier, please refer to the Amplifier connection page. (See pages 18 to 19) - The component jack of your TV may be marked "R-Y, B-Y, Y" or "Cr, Cb, Y" instead of "PR, PB, Y" depending on the manufacturer. The number and position of the jacks may vary depending on the TV set. Please refer to the user's manual of your TV. - When using an HDMI connection, S-Video will not be output. ENG-15
-
 1
1 -
2
-
3
-
4
-
5
-
6
-
7
-
8
-
9
-
 10
10 -
 11
11 -
 12
12 -
 13
13 -
 14
14 -
 15
15 -
 16
16 -
 17
17 -
 18
18 -
 19
19 -
 20
20 -
21
-
22
-
23
-
24
-
25
-
26
-
27
-
28
-
29
-
30
-
31
-
32
-
33
-
34
-
35
-
36
-
37
-
38
-
39
-
40
-
41
-
42
-
43
-
44
-
45
-
46
-
47
-
48
-
49
-
50
-
51
-
52
-
53
-
54
-
55
-
56
-
57
-
58
-
59
-
60
-
61
-
62
-
63
-
64
-
65
 |
 |
