Samsung HMX R10 User Manual (ENGLISH) - Page 124
Using a Component/AV cable, Y-Pb-Pr, Analog TV Out, Component.
 |
UPC - 036725302402
View all Samsung HMX R10 manuals
Add to My Manuals
Save this manual to your list of manuals |
Page 124 highlights
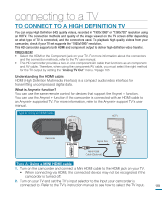
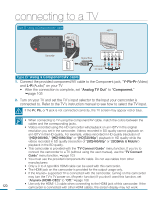
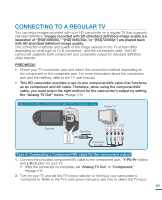
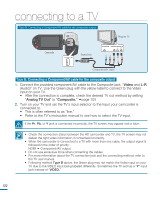
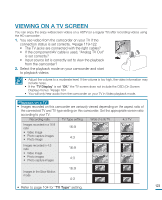
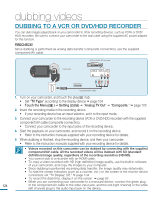
connecting to a TV Type B: Using a Component/AV cable HDTV Camcorder DC IN Signal flow COMPONENT IN AUDIO IN Y Pb Pr L R Component/ AV cable Type B: Using a Component/AV cable 1. Connect the provided component/AV cable to the Component jack, "Y-Pb-Pr (Video) and L-R (Audio)" on your TV • After the connection is complete, set "Analog TV Out" to "Component." page 105 2. Turn on your TV and set the TV's input selector to the Input your camcorder is connected to. Refer to the TV's instruction manual to see how to select the TV input. If the Pr, Pb, or Y jack is not connected correctly, the TV screen may appear red or blue. • When connecting to TV using the component/AV cable, match the colors between the cables and the corresponding jacks. • Videos recorded using the HD camcorder will playback on an HDTV in the original resolution you set in the camcorder. Videos recorded in SD quality cannot playback on an HDTV in the HD quality. For example, videos recorded in HD quality (resolution of "[HD]1080/60i," "[HD]1080/30p" or "[HD]720/60p") playback in HD quality while the videos recorded in SD quality (resolution of "[SD]480/60p" or "[SD]Web & Mobile") playback in the SD quality. • This camcorder is provided with the "TV Connect Guide" menu function. If you try to connect the camcorder to a TV (without using the user manual), use the "TV Connect Guide" menu function. page 103 • You must use the provided component/AV cable. Do not use cables from other manufacturers • Only a C to A type Mini HDMI cable can be used with this camcorder. • The HDMI jack on the camcorder is provided for the output usage only. • If the Anynet+ supported TV is connected with the camcorder, turning on the camcorder may turn the TV's TV power on. (Anynet+ function) If you don't want this function, set "Anynet+ (HDMI-CEC)" to "Off." page 106 120 • Use only the HDMI 1.3 cable when connecting to the HDMI jack of this camcorder. If the camcorder is connected with other HDMI cables, the screen display may not work.
-
 1
1 -
2
-
3
-
4
-
5
-
6
-
7
-
8
-
9
-
10
-
11
-
12
-
13
-
14
-
15
-
16
-
17
-
18
-
19
-
20
-
21
-
22
-
23
-
24
-
25
-
26
-
27
-
28
-
29
-
30
-
31
-
32
-
33
-
34
-
35
-
36
-
37
-
38
-
39
-
40
-
41
-
42
-
43
-
44
-
45
-
46
-
47
-
48
-
49
-
50
-
51
-
52
-
53
-
54
-
55
-
56
-
57
-
58
-
59
-
60
-
61
-
62
-
63
-
64
-
65
-
66
-
67
-
68
-
69
-
70
-
71
-
72
-
73
-
74
-
75
-
76
-
77
-
78
-
79
-
80
-
81
-
82
-
83
-
84
-
85
-
86
-
87
-
88
-
89
-
90
-
91
-
92
-
93
-
94
-
95
-
96
-
97
-
98
-
99
-
100
-
101
-
102
-
103
-
104
-
105
-
106
-
107
-
108
-
109
-
110
-
111
-
112
-
113
-
114
-
115
-
116
-
117
-
118
-
 119
119 -
 120
120 -
 121
121 -
 122
122 -
 123
123 -
 124
124 -
 125
125 -
 126
126 -
 127
127 -
 128
128 -
 129
129 -
130
-
131
-
132
-
133
-
134
-
135
-
136
-
137
-
138
-
139
-
140
-
141
-
142
-
143
-
144
-
145
-
146
-
147
-
148
-
149
-
150
-
151
-
152
-
153
-
154
-
155
-
156
-
157
 |
 |
