Samsung ML-1440 Service Manual - Page 72
Main Cover
 |
View all Samsung ML-1440 manuals
Add to My Manuals
Save this manual to your list of manuals |
Page 72 highlights
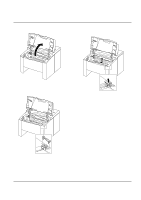
3-5 Main Cover 1. Remove two screws and remove the controller board. Disassembly and Reassembly 4. Remove two screws securing the main cover. 2. Remove two screws at the back of the printer and unplug one connector from the board, then open the rear cover. 5. Unlatch the front ends of the cover. 3. Open the printer cover, and open the MP tray. 6. Slide the main cover upward, out of the printer. Samsung Electronics Note that the power switch and the power connecter are properly released when you remove the cover. 3-5
-
 1
1 -
2
-
3
-
4
-
5
-
6
-
7
-
8
-
9
-
10
-
11
-
12
-
13
-
14
-
15
-
16
-
17
-
18
-
19
-
20
-
21
-
22
-
23
-
24
-
25
-
26
-
27
-
28
-
29
-
30
-
31
-
32
-
33
-
34
-
35
-
36
-
37
-
38
-
39
-
40
-
41
-
42
-
43
-
44
-
45
-
46
-
47
-
48
-
49
-
50
-
51
-
52
-
53
-
54
-
55
-
56
-
57
-
58
-
59
-
60
-
61
-
62
-
63
-
64
-
65
-
66
-
 67
67 -
 68
68 -
 69
69 -
 70
70 -
 71
71 -
 72
72 -
 73
73 -
 74
74 -
 75
75 -
 76
76 -
 77
77 -
78
-
79
-
80
-
81
-
82
-
83
-
84
-
85
-
86
 |
 |

Disassembly and Reassembly
3-5
Samsung Electronics
1.
Remove two screws and remove the controller board.
2.
Remove two screws at the back of the printer and
unplug one connector from the board, then open the
rear cover.
3.
Open the printer cover, and open the MP tray.
4.
Remove two screws securing the main cover.
5.
Unlatch the front ends of the cover.
6.
Slide the main cover upward, out of the printer.
3-5
Main Cover
Note that the power switch
and the power connecter
are properly released when
you remove the cover.